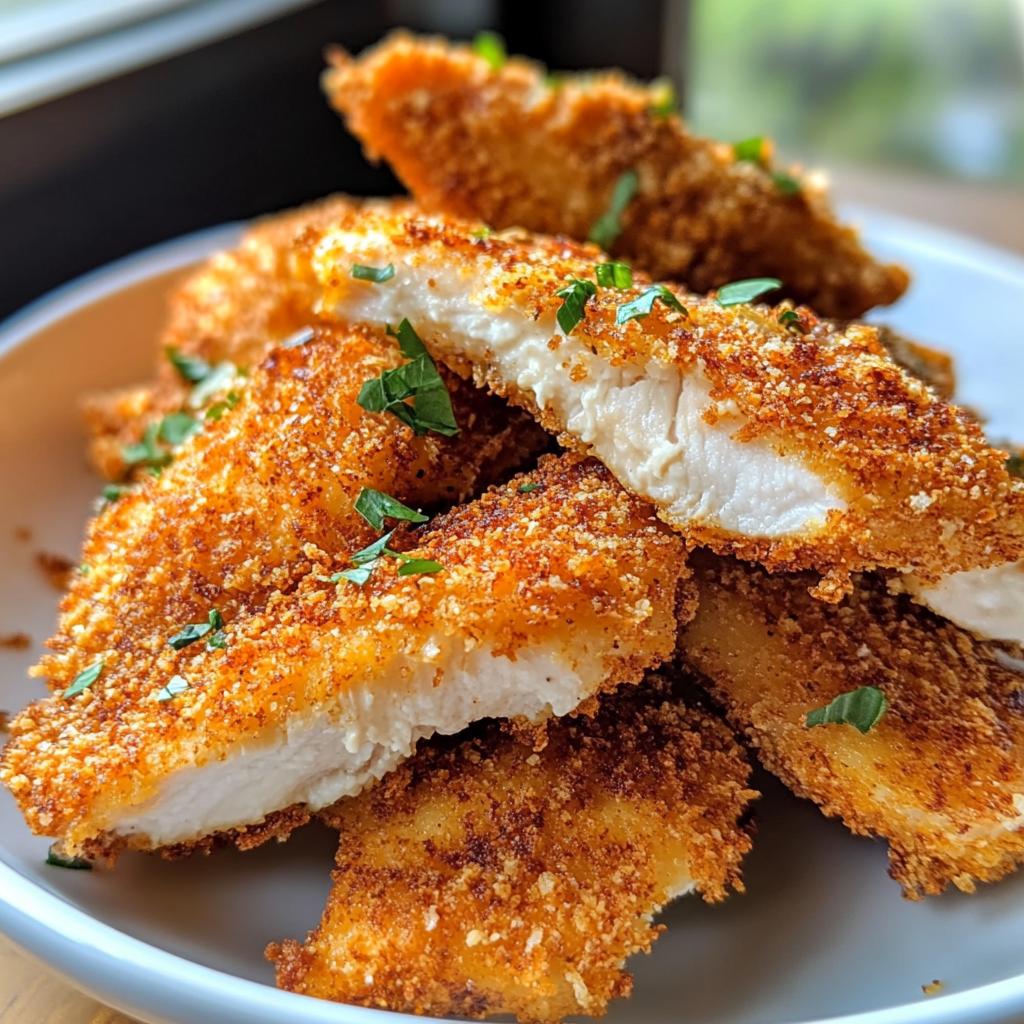
Let me tell you, there’s nothing quite like biting into a perfectly crispy piece of air fryer chicken katsu! The crunch of the panko breadcrumbs combined with the juicy tenderness of the chicken creates a flavor explosion that’s simply unforgettable. And the best part? This version gives you all that deliciousness with a healthier twist, thanks to the magic of the air fryer. No greasy mess, just golden perfection in under 15 minutes!
I remember the first time I tried making chicken katsu at home. I was a bit intimidated by the frying process, but then I discovered the air fryer, and it changed everything! Now, I can whip up this Japanese classic anytime I crave it, without the guilt of deep frying. It’s a fantastic dish for busy weeknights or when you want to impress friends at dinner. Trust me, once you try this recipe, you’ll keep it in your rotation. It’s quick, easy, and delivers all the savory goodness you could want from a comforting meal. So, let’s dive into making this tasty dish together!
Ingredients List
To make the most delicious air fryer chicken katsu, you’ll need just a handful of simple ingredients. Here’s what you’ll need:
- 2 chicken fillets
- 1 cup panko breadcrumbs
- 1/2 cup flour
- 1 egg
- 1 teaspoon salt
- 1/2 teaspoon pepper
- 1 teaspoon garlic powder
- 1 teaspoon onion powder
These ingredients come together to create that irresistible crunch and savory flavor you’ll love. Make sure to grab fresh chicken fillets for the best results, and don’t skimp on the panko breadcrumbs; they’re the secret to that perfect crispy coating!
How to Prepare Air Fryer Chicken Katsu
Now, let’s dive into the heart of making this crispy air fryer chicken katsu! I promise you, once you get the hang of these steps, it’ll feel like you’re a pro in the kitchen. Don’t worry, I’ll guide you through each part of the process, step by step.
Prepping the Chicken
First things first, we need to get our chicken fillets ready. Start by placing your chicken between two sheets of plastic wrap or parchment paper. This not only keeps things tidy but also helps in evenly pounding the chicken without any mess. Grab a meat mallet or rolling pin and pound the chicken to about half an inch thick. You want it even so it cooks perfectly throughout.
Next, it’s time to season the flour. In a shallow dish, mix together your ½ cup of flour, 1 teaspoon of salt, ½ teaspoon of pepper, 1 teaspoon of garlic powder, and 1 teaspoon of onion powder. This blend adds a flavor boost right from the start, ensuring every bite is seasoned to perfection!
Breading the Chicken
Now for the fun part — breading! Set up a little assembly line with three shallow dishes: one for your seasoned flour, one for the beaten egg (just whisk it up in a bowl), and the last for your 1 cup of panko breadcrumbs. Grab a piece of chicken, first dip it into the flour, making sure to coat both sides well. Shake off any excess flour; we don’t want clumps here!
Next, dip the floured chicken into the egg, letting any extra drip off. Finally, coat it with the panko breadcrumbs, pressing gently to ensure they stick. This is where the magic happens; those breadcrumbs are going to create that crispy exterior we all love!
Repeat this process for the second chicken fillet. Once you have both pieces breaded, set them aside for a moment while we get our air fryer ready.
Air Frying Instructions
Preheat your air fryer to 400°F (200°C). This is a crucial step because it ensures your chicken starts cooking right away, giving you that lovely golden brown finish. Once preheated, carefully place the chicken fillets in the air fryer basket in a single layer. Make sure not to overcrowd them; give them room to breathe and crisp up!
Cook the chicken for about 10-12 minutes. If you’re using thicker fillets, you might need to add a couple of extra minutes — just keep an eye on them! You’ll know they’re ready when they’re golden brown and the internal temperature reaches 165°F (75°C). For an extra crunch, you can lightly spray the tops of the chicken with cooking oil before air frying. This little tip makes a world of difference!
Once done, carefully remove the chicken from the air fryer and let it rest for a few minutes. This helps keep it juicy. Now you’re ready to slice and serve this delicious dish!
Why You’ll Love This Recipe
This air fryer chicken katsu is a game changer for anyone who loves a delicious meal without the fuss. Here are just a few reasons why you’re going to adore this recipe:
- Quick Preparation: With a total time of just 27 minutes, you can have a mouthwatering meal ready in no time. Perfect for busy weeknights!
- Delicious Flavor: The savory seasoning and crispy panko coating create a flavor explosion that’s hard to resist. Trust me, every bite is packed with goodness!
- Healthier Cooking Method: Thanks to the air fryer, you’ll enjoy all the crunch of traditional katsu without the added oil and grease. It’s a guilt-free treat!
- Easy Cleanup: No messy frying pans or splatters to deal with. Just pop everything in the air fryer and enjoy the simplicity!
Once you try this recipe, you’ll see why it’s become a staple in my kitchen. You get all the flavor you crave, with none of the hassle. What’s not to love?
Tips for Success
Now that you’re ready to make this amazing air fryer chicken katsu, here are some of my best tips to ensure you achieve fantastic results every time. Trust me, these little tricks can make a big difference!
Let it Rest
After removing the chicken from the air fryer, let it rest for about 3-5 minutes before slicing. This resting time allows the juices to redistribute throughout the chicken, keeping it moist and tender. I know it’s tempting to dig right in, but a little patience goes a long way!
Keep It Crispy
If you want to maintain that delightful crunch, avoid covering the chicken with foil or a lid after frying, as this can trap steam and make the coating soggy. Instead, serve it right away or keep it on a wire rack if you need to let it sit for a few minutes before serving.
Use Cooking Spray Wisely
For an extra crispy texture, lightly spray the chicken with cooking oil before air frying. A quick mist helps the panko breadcrumbs crisp up beautifully and gives you that golden-brown finish we all love. Just don’t go overboard; a little goes a long way!
Batch Cooking
If you’re cooking for a crowd, consider making the chicken katsu in batches. You can keep the first batch warm in a low oven (around 200°F or 93°C) while the next one cooks. This way, everyone gets to enjoy their chicken katsu hot and crispy!
Experiment with Seasonings
Feel free to get creative with your seasonings! While my go-to blend is delicious, you can switch things up by adding a pinch of cayenne for heat or some sesame seeds for an extra crunch. The beauty of this recipe is how versatile it can be, so don’t be afraid to make it your own!
With these tips in your back pocket, you’re all set to create the best air fryer chicken katsu. Happy cooking!
Nutritional Information
Before we dig into the deliciousness of air fryer chicken katsu, it’s important to talk about the nutritional aspects. Just a heads up, the nutritional values can vary based on the specific ingredients and brands you use, so consider this as a general guide rather than a precise measurement.
Here are the typical nutritional values for one piece of air fryer chicken katsu:
- Calories: 350
- Fat: 10g
- Saturated Fat: 2g
- Unsaturated Fat: 7g
- Trans Fat: 0g
- Cholesterol: 100mg
- Sodium: 600mg
- Carbohydrates: 30g
- Fiber: 1g
- Sugar: 1g
- Protein: 30g
This air fryer chicken katsu packs a punch with a good balance of protein and flavor while keeping things on the healthier side. Enjoy it guilt-free, knowing you’re treating yourself to something delicious yet nutritious!
FAQ Section
Got questions about making the perfect air fryer chicken katsu? Don’t worry, I’ve got you covered! Here are some common questions I hear, along with my answers to help you get the most out of this delicious dish.
Can I use chicken thighs instead of chicken breasts?
Absolutely! Chicken thighs can add extra juiciness and flavor to your katsu. Just make sure to pound them to an even thickness, just like you would with chicken breasts, to ensure they cook evenly. You might need to adjust the cooking time slightly, so keep an eye on them!
What’s the best way to store leftovers?
If you have any leftovers (which is rare, but it happens!), let the chicken cool completely, then store it in an airtight container in the fridge. It should last for about 3 days. Just remember, for the best texture, reheat in the air fryer for a few minutes to help regain that crispy coating!
Can I make this gluten-free?
You sure can! Simply swap out the regular flour and panko breadcrumbs for gluten-free alternatives. There are some fantastic gluten-free panko options available that will give you that same great crunch without the gluten. Just check the labels to make sure they fit your dietary needs!
What can I serve with chicken katsu?
Chicken katsu pairs beautifully with a variety of sides! I love serving it with steamed rice and a simple salad for a fresh crunch. You can also whip up some homemade tonkatsu sauce for dipping, which adds a lovely savory touch. Feel free to get creative — the options are endless!
Can I make air fryer chicken katsu ahead of time?
While it’s best enjoyed fresh, you can certainly prepare the chicken and bread it ahead of time. Just keep the breaded chicken fillets in the fridge until you’re ready to cook them. When it’s time to eat, just pop them in the air fryer for a quick and tasty meal!
With these FAQs answered, you’re all set to tackle your air fryer chicken katsu with confidence. Enjoy the crispy goodness!
Storage & Reheating Instructions
So, you’ve made this delicious air fryer chicken katsu and have some leftovers? No worries! Proper storage will keep that crispy goodness as fresh as possible. Here’s how to do it:
First, let the chicken cool completely at room temperature. Once cooled, transfer the pieces to an airtight container. This will help lock in moisture and keep them from drying out. If you have multiple pieces, you can layer them with parchment paper in between to prevent them from sticking together. Store the container in the fridge, and they’ll be good for about 3 days.
Now, when it comes to reheating, I highly recommend using the air fryer again! Preheat your air fryer to 375°F (190°C). Place the chicken katsu in the basket in a single layer, and heat for about 3-5 minutes. This will help restore that delightful crunch. Just keep an eye on them, as you want them heated through without overcooking.
If you don’t have an air fryer handy, you can also reheat in an oven. Preheat to 350°F (175°C) and place the chicken on a baking sheet. Cover it loosely with foil to prevent drying out and heat for about 10-15 minutes, or until warmed through.
Remember, while reheating is great, chicken katsu is definitely best enjoyed fresh. But with these tips, you can still savor those delicious leftovers! Enjoy!
Serving Suggestions
Now that you’ve perfected your air fryer chicken katsu, it’s time to think about what to serve alongside this crispy delight! Trust me, the right accompaniments can elevate your meal to a whole new level. Here are some of my favorite ideas:
- Steamed Rice: A classic pairing! The fluffy texture of white or brown rice balances the savory flavors of the chicken katsu beautifully. Drizzle a little soy sauce or sprinkle some sesame seeds on top for an extra touch!
- Simple Salad: A refreshing salad with crisp greens, cucumber, and a light vinaigrette complements the richness of the katsu. I love adding some shredded carrots and cherry tomatoes for color and crunch. It’s a great way to get some veggies in!
- Tonkatsu Sauce: Don’t forget the dipping sauce! This sweet and tangy sauce is a must. You can buy it pre-made or whip up a quick version by mixing ketchup, Worcestershire sauce, and a bit of sugar. It adds a delicious kick!
- Pickled Vegetables: A side of pickled daikon or other pickled veggies adds a nice tang and crunch. They cut through the richness of the katsu and refresh your palate with each bite!
- Coleslaw: A creamy coleslaw can add a wonderful texture contrast. The coolness of the slaw balances the warm, crispy chicken perfectly. You can go with a classic mayo-based slaw or a lighter vinegar-based option.
Feel free to mix and match these suggestions based on your mood or what you have on hand. The beauty of this dish is its versatility, and with these sides, you’ll have a fantastic meal that’s sure to impress!
Print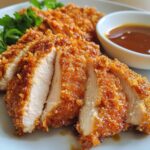
Air Fryer Chicken Katsu: 15-Minute Crispy Delight
- Total Time: 27 minutes
- Yield: 2 servings 1x
- Diet: Gluten Free
Description
Crispy air fryer chicken katsu with a savory flavor.
Ingredients
- 2 chicken fillets
- 1 cup panko breadcrumbs
- 1/2 cup flour
- 1 egg
- 1 teaspoon salt
- 1/2 teaspoon pepper
- 1 teaspoon garlic powder
- 1 teaspoon onion powder
Instructions
- Preheat your air fryer to 400°F (200°C).
- Pound the chicken fillets to an even thickness.
- Season flour with salt, pepper, garlic powder, and onion powder.
- Dip chicken in flour, then egg, and finally coat with panko breadcrumbs.
- Place chicken in the air fryer basket in a single layer.
- Cook for 10-12 minutes or until golden brown and cooked through.
- Remove from air fryer and let rest for a few minutes before slicing.
Notes
- Serve with tonkatsu sauce for dipping.
- Adjust cooking time for thicker chicken fillets.
- For extra crunch, spray chicken with cooking oil before air frying.
- Prep Time: 15 minutes
- Cook Time: 12 minutes
- Category: Main Dish
- Method: Air Frying
- Cuisine: Japanese
Nutrition
- Serving Size: 1 piece
- Calories: 350
- Sugar: 1g
- Sodium: 600mg
- Fat: 10g
- Saturated Fat: 2g
- Unsaturated Fat: 7g
- Trans Fat: 0g
- Carbohydrates: 30g
- Fiber: 1g
- Protein: 30g
- Cholesterol: 100mg
Keywords: air fryer chicken katsu, chicken katsu, air fryer recipes