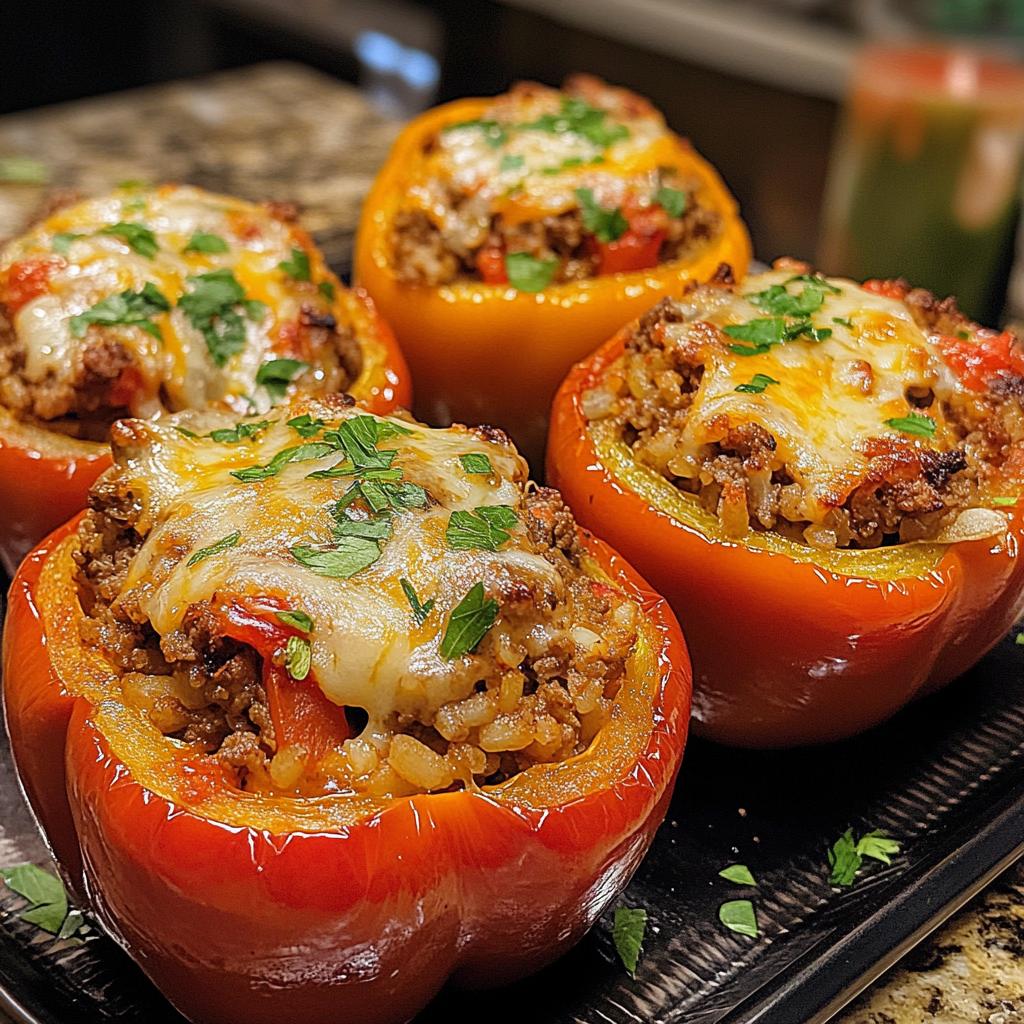
Ah, the *best classic stuffed peppers*! These beauties have a special place in my heart and my kitchen. I remember the first time I made them; it was a chilly evening, and I was determined to impress my family with something hearty and flavorful. I stuffed those bell peppers with a mixture of ground beef, rice, and spices, and when they came out of the oven, the aroma filled the whole house. It was pure magic!
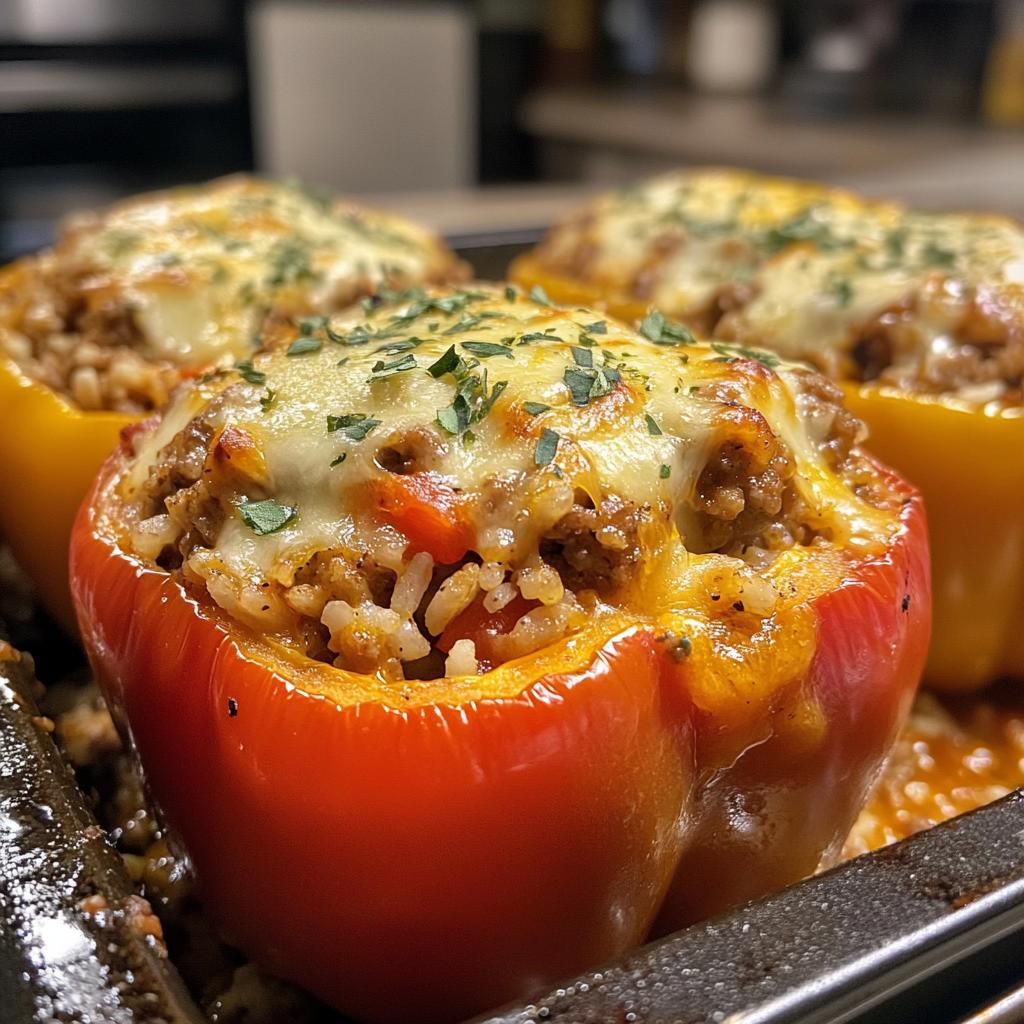
What I love most about this dish is how easy it is to prepare. You can whip them up in under an hour, and they’re packed with flavor thanks to the savory filling and the sweetness of the roasted peppers. Plus, they’re so versatile! You can change up the ingredients to suit your taste or what you have on hand. Trust me, once you take that first bite, you’ll understand why these stuffed peppers have become a family favorite. They’re comforting, satisfying, and just downright delicious!
Ingredients List
To make the *best classic stuffed peppers*, you’ll need a handful of simple yet flavorful ingredients. Here’s what you’ll need:
- 4 large bell peppers (any color you like, but I’m partial to vibrant red or yellow for that sweet flavor)
- 1 pound ground beef (you can also use ground turkey if you prefer a lighter option)
- 1 cup cooked rice (white or brown works wonderfully; just make sure it’s fluffy!)
- 1 onion, chopped (this adds a nice depth of flavor)
- 2 cloves garlic, minced (because garlic makes everything better, am I right?)
- 1 can diced tomatoes (14.5 oz; don’t forget to drain them a bit to avoid sogginess!)
- 1 teaspoon Italian seasoning (or your favorite herbs to elevate those flavors)
- Salt and pepper to taste (always season to your liking!)
- 1 cup shredded cheese (I love a mix of mozzarella and cheddar for that gooey finish)
Gathering these ingredients will get you well on your way to creating a delicious meal that everyone will adore!
How to Prepare Instructions
Now that you’ve got your ingredients ready, let’s dive into the preparation of the *best classic stuffed peppers*! This part is where the magic happens, and I promise it’s super simple. Just follow these steps, and you’ll have a delicious meal ready in no time!
Preheat and Prepare
First things first, you’ll want to preheat your oven to 375°F (190°C). This is a crucial step because a hot oven means perfectly cooked peppers! While that’s warming up, grab your bell peppers and give them some love. Cut the tops off and gently remove the seeds and membranes. I like to use a small paring knife for this part; it makes it easier to get everything out without damaging the pepper. Set them aside while you prepare the filling!
Cook the Filling
Next, let’s get to the filling! Heat a skillet over medium heat and add your ground beef. Break it up with a spatula as it cooks, and toss in the chopped onion and minced garlic. The smell of that sizzling beef, onion, and garlic is just heavenly! You’ll want to cook this until the beef is browned and no longer pink – about 5 to 7 minutes. Remember, you can drain any excess grease if you prefer a leaner filling!
Combine Ingredients
Once your beef is cooked, it’s time to mix in the other goodies! Add the cooked rice, diced tomatoes (make sure you drain them a bit!), Italian seasoning, and a sprinkle of salt and pepper into the skillet. This is where you can really play with flavors! Give everything a good stir and let it cook together for about 2 minutes. Trust me, the aroma will be irresistible!
Stuff the Peppers
Now comes the fun part – stuffing the peppers! Take each pepper and fill it generously with the beef and rice mixture. Don’t be shy! You want to pack it in there, but leave a little space at the top since the filling will expand while baking. I usually use a spoon to help push the mixture down into the peppers, ensuring they’re filled to the brim.
Baking Instructions
Place your stuffed peppers upright in a baking dish. If you have any leftover filling, feel free to spoon it around the peppers in the dish! Cover the dish tightly with foil and pop it in the preheated oven. Bake for about 30 minutes, which gives those flavors time to meld beautifully. After that, remove the foil to let the tops brown a bit, and bake for an additional 10 minutes. The peppers should be tender and slightly charred at the edges!
Finishing Touches
Before you take them out, let’s add that delicious cheese! Remove the foil and sprinkle the shredded cheese generously over the tops of the peppers. Return them to the oven for those last 10 minutes until the cheese is melted and bubbly. Wow, can you smell that? It’s going to be hard to wait, but trust me – the wait is worth it!
Why You’ll Love This Recipe
- Quick and Easy Preparation: With just 15 minutes of prep time, you can have these delicious stuffed peppers in the oven, making it perfect for busy weeknights!
- Family-Friendly Flavors: The combination of savory ground beef, fluffy rice, and sweet bell peppers appeals to everyone, from kids to adults. It’s a meal that brings smiles all around!
- Customizable: Feel free to swap out ingredients! Use ground turkey or add your favorite veggies to the filling for an extra nutritional boost. The possibilities are endless!
- Nutrient-Packed: Stuffed peppers are a great way to sneak in vegetables, and with protein from the beef and fiber from the rice, they make a balanced meal that’s satisfying and wholesome.
- Leftovers for Days: These stuffed peppers store beautifully! You can enjoy them for lunch or dinner the next day, making meal prep a breeze.
Tips for Success
Now that you’re all set to make the *best classic stuffed peppers*, let me share some pro tips to ensure they turn out perfectly every time! With just a few tweaks and tricks, you’ll be a stuffed pepper pro in no time.
Ingredient Swaps That Work Wonders
Don’t hesitate to get creative with your ingredients! If you want a lighter option, swap the ground beef for ground turkey or even chicken. Both options provide a delicious flavor while cutting back on fat. You can also play around with the rice; try quinoa for a nutty twist or cauliflower rice for a low-carb version. And if you’re looking to sneak in some extra veggies, chop up zucchini, mushrooms, or spinach and toss them into the filling!
Don’t Skimp on Seasoning
Seasoning is key! Make sure you taste the filling before stuffing the peppers. If it feels a bit bland, don’t be afraid to add more salt, pepper, or herbs. Fresh herbs like parsley or basil can brighten the flavor, so feel free to sprinkle some in. Trust me, your taste buds will thank you!
Perfect Pepper Prep
When preparing your bell peppers, make sure you don’t cut them too short. You want enough height to hold all that delicious filling! Also, if you’re using green peppers, keep in mind they have a stronger, more bitter flavor compared to their sweeter counterparts. If your family prefers a milder taste, stick to red, yellow, or orange peppers.
Keep an Eye on Baking Time
Every oven is a little different, so keep an eye on your peppers while they bake. If they’re browning too quickly, you can cover them with foil again to prevent burning. You want the peppers to be tender but not mushy, so a gentle poke with a fork can help you gauge their tenderness!
Let Them Rest
After pulling your stuffed peppers from the oven, give them a few minutes to rest before digging in. This helps the flavors settle and makes for easier serving. Plus, it’s a great time to whip up a quick side salad or some crusty bread to enjoy with your meal!
By following these tips, you’ll be well on your way to mastering the art of stuffed peppers. Enjoy the process, and I can’t wait for you to take that first bite of your delicious creation!
Nutritional Information
Before we dive into the deliciousness of the *best classic stuffed peppers*, it’s important to note that nutritional values can vary based on the specific ingredients and brands you use. So, while I can provide some typical values, they’re not set in stone. Always consider checking the labels of your ingredients if you need precise information!
For one stuffed pepper, you can generally expect the following nutritional breakdown:
- Calories: 350
- Fat: 20g
- Saturated Fat: 8g
- Cholesterol: 70mg
- Sodium: 600mg
- Carbohydrates: 30g
- Fiber: 3g
- Protein: 20g
- Sugar: 5g
This hearty meal packs a nutritional punch, delivering a good balance of protein, healthy fats, and carbs! Enjoy knowing that you’re not just treating your taste buds but fueling your body too!
FAQ Section
Got questions about the *best classic stuffed peppers*? Don’t worry, I’ve got you covered! Here are some common queries I often hear, along with my answers to help you make the most of this delicious dish!
Can I make stuffed peppers ahead of time?
Absolutely! You can prepare the stuffed peppers a day in advance. Just follow the steps up to the baking part, cover them tightly with foil, and store them in the fridge. When you’re ready to cook, pop them in the oven straight from the fridge, but you may need to add an extra 10-15 minutes to the baking time.
What can I use instead of ground beef?
If ground beef isn’t your thing, there are plenty of tasty alternatives! Ground turkey or chicken works wonderfully for a lighter version, and you can even use lentils or black beans for a vegetarian option. Just make sure to adjust the cooking time if you’re using different ingredients!
Can I freeze the stuffed peppers?
Yes, freezing is a great option! Just make sure they’re fully cooled before placing them in an airtight container or freezer bag. They’ll keep in the freezer for up to three months. When you’re ready to enjoy them, thaw in the fridge overnight and bake as usual!
How do I know when the peppers are done baking?
The best way to check if your stuffed peppers are done is to look for tenderness. They should be soft and slightly charred at the edges. You can also use a fork to poke one – if it goes in easily, they’re ready! And don’t forget that melted cheese on top is a good sign too!
What sides pair well with stuffed peppers?
Stuffed peppers are pretty versatile when it comes to sides! A simple green salad is always a hit, or you can serve them with some crusty bread to soak up the delicious juices. Garlic bread and a light pasta dish also complement them nicely. Just pick whatever sounds good to you!
Storage & Reheating Instructions
Alright, let’s talk about what to do with those *best classic stuffed peppers* leftovers! First off, if you’ve got any extras (which is likely because they’re so filling), you’ll want to store them properly to keep all that deliciousness intact.
To store your stuffed peppers, let them cool completely before transferring them to an airtight container. You can keep them in the fridge for up to 3 days, which makes for a fantastic grab-and-go lunch or dinner option! Just make sure to separate any extra sauce or filling if you have it; this prevents everything from getting soggy.
Now, if you’re thinking about freezing your stuffed peppers, you’re in luck! They freeze beautifully. Wrap each stuffed pepper individually in plastic wrap and then place them in a freezer-safe bag or container. They’ll stay fresh for up to 3 months. Just don’t forget to label them with the date so you know when they were made!
When you’re ready to enjoy your leftovers, the best way to reheat them is in the oven. Preheat your oven to 350°F (175°C), place the peppers in a baking dish, and cover them with foil to keep them moist. Heat for about 20-25 minutes or until they’re warmed through. If you like a bit of a crispy top, remove the foil for the last 5 minutes to let that cheese bubble and brown a little.
If you’re in a hurry, you can also reheat them in the microwave! Just pop one or two on a microwave-safe plate, cover them with a damp paper towel, and heat them in 1-minute intervals until they’re hot all the way through. Just be careful not to overdo it; nobody wants rubbery peppers!
So, whether you’re savoring them fresh out of the oven or enjoying the leftovers, these stuffed peppers are bound to be a hit! Happy cooking and storing!
Print
Best Classic Stuffed Peppers That Will Delight You Today
- Total Time: 55 minutes
- Yield: 4 servings 1x
- Diet: Gluten Free
Description
A simple recipe for classic stuffed peppers filled with rice, ground beef, and spices.
Ingredients
- 4 large bell peppers
- 1 pound ground beef
- 1 cup cooked rice
- 1 onion, chopped
- 2 cloves garlic, minced
- 1 can diced tomatoes (14.5 oz)
- 1 teaspoon Italian seasoning
- Salt and pepper to taste
- 1 cup shredded cheese
Instructions
- Preheat oven to 375°F (190°C).
- Cut the tops off the bell peppers and remove the seeds.
- In a skillet, brown the ground beef with onion and garlic.
- Add cooked rice, diced tomatoes, Italian seasoning, salt, and pepper to the skillet.
- Stuff the mixture into the bell peppers.
- Place peppers in a baking dish and cover with foil.
- Bake for 30 minutes.
- Remove foil, top with cheese, and bake for an additional 10 minutes.
- Serve hot.
Notes
- You can substitute ground turkey for beef.
- Add chopped vegetables for extra nutrition.
- Store leftovers in the refrigerator for up to 3 days.
- Prep Time: 15 minutes
- Cook Time: 40 minutes
- Category: Main Course
- Method: Baking
- Cuisine: American
Nutrition
- Serving Size: 1 stuffed pepper
- Calories: 350
- Sugar: 5g
- Sodium: 600mg
- Fat: 20g
- Saturated Fat: 8g
- Unsaturated Fat: 10g
- Trans Fat: 0g
- Carbohydrates: 30g
- Fiber: 3g
- Protein: 20g
- Cholesterol: 70mg
Keywords: best classic stuffed peppers


