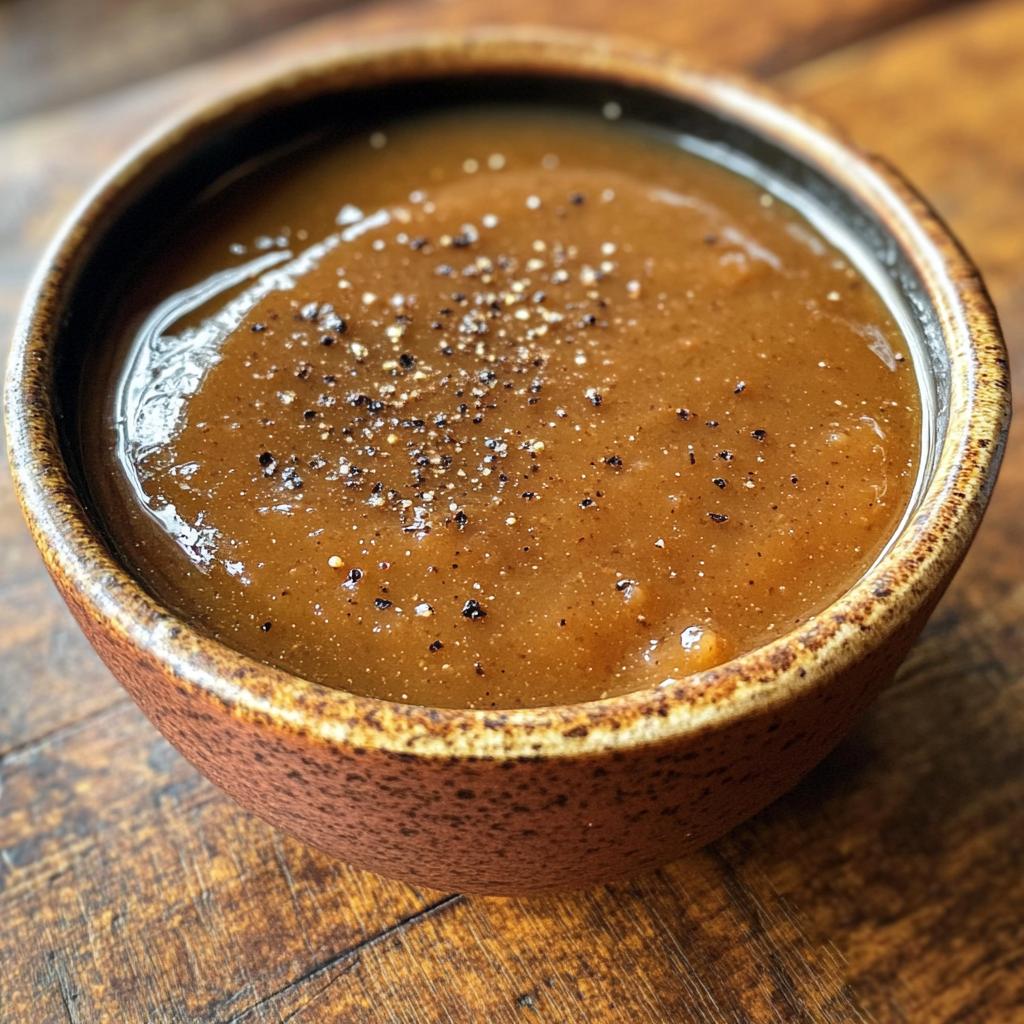
Ah, brown gravy! It’s like the magic spell that transforms any meal into something special. I can’t tell you how many family dinners have been graced by this rich, savory sauce. Whether it’s pouring it over fluffy mashed potatoes or drenching a slice of roast beef, brown gravy has this incredible power to elevate everything on your plate. I remember my grandmother would always make a big pot of it whenever we gathered for Sunday dinner. The aroma would waft through the house, pulling everyone in like a cozy hug. And let me tell you, there’s nothing quite like that first bite of a juicy meatloaf smothered in homemade brown gravy. It’s comfort food at its finest! Plus, it’s super versatile. You can tweak the flavors, make it with different broths, or even toss in some herbs for a unique twist. Trust me, once you master this gravy, it’ll become a staple in your kitchen, ready to enhance any meal. So, let’s get cooking and bring that warmth and richness to our tables!

Ingredients for Brown Gravy
Making brown gravy is straightforward, and you’ll need just a few simple ingredients to get started. Here’s what you’ll need:
- 2 tablespoons of unsalted butter
- 2 tablespoons of all-purpose flour
- 2 cups of low-sodium beef broth
- 1 tablespoon of soy sauce
- Salt to taste
- Pepper to taste
These ingredients come together to create a deliciously rich gravy that’s perfect for drenching over your favorite comfort foods. Don’t worry if you want to experiment; you can even swap out the beef broth for chicken or vegetable broth, depending on your taste preferences! Happy cooking!
How to Prepare Brown Gravy
Now that you have your ingredients ready, let’s dive into making this rich and savory brown gravy. It’s easier than you might think, and I promise you’ll love the result!
Step 1: Melt the Butter
Start by melting the butter in a medium saucepan over medium heat. You want it to melt gently—no rushing here! Keep an eye on it so it doesn’t brown too much or burn. We’re going for that lovely, golden hue that sets the stage for our gravy.
Step 2: Incorporate the Flour
Once the butter is melted, it’s time to stir in the flour. Mix it in well and cook for about 2-3 minutes until it turns a nice, light brown color. This is called making a roux, and it’s crucial for thickening your gravy. You’ll know you’re on the right track when you start to smell that nutty aroma—oh, it’s heavenly!
Step 3: Add the Beef Broth
Now comes the fun part! Slowly pour in the beef broth while whisking continuously. This step is super important to prevent any lumps from forming. Just keep whisking until everything is combined and smooth. You’ll love how it starts to thicken right before your eyes!
Step 4: Mix in Soy Sauce
After the broth is fully incorporated, stir in the soy sauce. This isn’t just for color; it adds a depth of flavor that really enhances the gravy. Give it a good stir, and just like that, you’re on your way to rich deliciousness!
Step 5: Season to Taste
Now, season your gravy with salt and pepper to your liking. Don’t be shy—taste as you go! You want it to be just right for your meal. Remember, you can always add more, but it’s hard to take it out once it’s in!
Step 6: Simmer Until Thickened
Let your gravy simmer for about 5-10 minutes, stirring occasionally. You’ll know it’s thickened when it coats the back of a spoon. If you want it thicker, feel free to let it simmer a bit longer. Just keep an eye on it so it doesn’t get too thick, and adjust to your preferred consistency.
And that’s it! You’ve just made a delicious brown gravy that’s perfect for all sorts of meals. Now, go ahead and drizzle it over those mashed potatoes or your favorite meat dish. Enjoy!
Nutritional Information
Let’s take a quick look at the nutritional details of this delicious brown gravy. Keep in mind that these values are estimates based on typical ingredients and can vary slightly depending on what you use. Here’s what you can expect per serving (1/4 cup):
- Calories: 50
- Fat: 2g
- Saturated Fat: 1g
- Unsaturated Fat: 1g
- Trans Fat: 0g
- Cholesterol: 5mg
- Sodium: 400mg
- Carbohydrates: 6g
- Fiber: 0g
- Sugar: 1g
- Protein: 2g
This rich gravy is low in calories, making it a guilt-free addition to your meals. Whether you’re drizzling it over hearty meats or creamy mashed potatoes, it packs a flavorful punch without breaking the calorie bank! Enjoy every spoonful without worry!
Why You’ll Love This Recipe
- Quick Preparation: This brown gravy comes together in just about 15 minutes, making it a perfect last-minute addition to any meal.
- Rich Flavor: The combination of beef broth, butter, and soy sauce creates a deep, savory flavor that enhances everything it touches.
- Versatile Serving: Whether you’re pouring it over mashed potatoes, meatloaf, or even roasted vegetables, this gravy makes everything taste better.
- Customizable: Feel free to swap out the beef broth for chicken or vegetable broth, or add your favorite herbs and spices for a personal twist!
- Comfort Food Essential: Brown gravy is the ultimate comfort food companion, perfect for family gatherings and cozy dinners alike.
Tips for Success
Making the perfect brown gravy is all about a few key tips that can elevate your dish from good to absolutely fabulous. Here’s what I’ve learned over the years:
- Adjusting Thickness: If you prefer a thicker gravy, just add a little more flour to your roux. You can also let it simmer a bit longer to achieve that desired consistency. Just keep stirring to prevent sticking!
- Flavor Variations: Don’t hesitate to get creative! Toss in some fresh herbs like thyme or rosemary for an earthy note, or add a splash of Worcestershire sauce for extra depth. You could even sauté some onions or garlic in the butter before adding the flour for a flavor boost.
- Using Different Broths: While beef broth is a classic choice, experimenting with chicken or vegetable broth can open up a whole new world of flavor. Each broth brings its own unique taste, so find what works best for your meal!
- Whisking Technique: When adding the broth, whisk vigorously to avoid lumps. A smooth gravy is what you’re aiming for, and a good whisk brings everything together beautifully.
- Tasting as You Go: Always taste your gravy as you season it. This ensures that you hit the right balance of flavors, and you can adjust the salt and pepper to suit your personal preferences.
With these tips in your back pocket, you’ll be well on your way to mastering the art of brown gravy. Happy cooking!
Variations of Brown Gravy
Now that you’ve got the basics down, let’s have some fun with variations on this classic brown gravy recipe! There are so many ways to tweak it and make it your own, so let’s dive into some delicious ideas!
- Different Broths: While beef broth is a classic choice, don’t hesitate to experiment! Chicken broth or vegetable broth can create a lighter flavor profile, perfect for chicken dishes or vegetarian meals. You might even try using a rich mushroom broth for an earthy twist!
- Herbs and Spices: Fresh herbs like thyme, rosemary, or even sage can add a delightful aroma and flavor. Just toss them in when you add the beef broth for an infusion of freshness. If you’re feeling adventurous, a pinch of smoked paprika or cayenne pepper can give your gravy a subtle kick!
- Onion and Garlic: For an extra depth of flavor, sauté some finely chopped onions or minced garlic in the melted butter before adding the flour. This simple step adds a whole new dimension to your gravy!
- Wine or Beer: If you want to impress your guests, consider adding a splash of red wine or dark beer after you’ve added the broth. Let it simmer for a couple of minutes to cook off the alcohol, and you’ll be left with a rich, complex flavor that’s truly special.
- Sweetness Balance: A drizzle of balsamic vinegar or a teaspoon of brown sugar can balance the savory notes if you prefer a touch of sweetness. It’s a great way to round out the flavors!
With these variations, you’ll never get bored of making brown gravy! Each twist allows you to tailor it to suit whatever meal you’re serving, making it an incredibly versatile addition to your kitchen repertoire. Enjoy experimenting!
Storage & Reheating Instructions
So, you’ve made a delicious batch of brown gravy, and now you want to save some for later—great choice! Proper storage will keep it fresh and tasty for your next meal.
First things first, let the gravy cool down to room temperature before storing it. This step helps prevent condensation, which can lead to unwanted moisture in your storage container. Once it’s cooled, transfer your gravy into an airtight container. I love using glass containers because they keep everything nice and fresh, and you can see what’s inside!
Store your brown gravy in the refrigerator for up to 3-4 days. If you want to keep it longer, consider freezing it! Just pour the gravy into freezer-safe bags or containers, leaving some space for expansion. It can last in the freezer for about 2-3 months. When you’re ready to use it, just thaw it overnight in the fridge before reheating.
Now, onto reheating! When you’re ready to enjoy your leftover gravy, pour it into a saucepan and gently heat it over low to medium heat. Stir it occasionally to ensure it heats evenly. If it’s a bit thicker than you’d like, don’t hesitate to whisk in a splash of beef broth or water to get the perfect consistency. You’ll want it hot and ready to pour over your meal, so keep an eye on it!
And that’s all there is to it! With these simple storage and reheating tips, your homemade brown gravy will be just as delicious the second time around. Happy eating!
FAQ About Brown Gravy
Got questions about brown gravy? Don’t worry, I’ve got you covered! Here are some common queries I’ve encountered, along with my tried-and-true answers.
Can I make brown gravy gluten-free?
Absolutely! To make a gluten-free version, simply substitute the all-purpose flour with a gluten-free flour blend or cornstarch. If you go the cornstarch route, mix it with a little cold water to make a slurry before adding it to the gravy. This will help achieve that thick, luscious texture without any gluten!
How can I thicken my brown gravy?
If your gravy isn’t as thick as you’d like, there are a couple of easy fixes. You can mix a tablespoon of flour or cornstarch with a bit of cold water to make a slurry, then slowly whisk it into the simmering gravy. Give it a few minutes to cook through, and you should see it thicken up nicely. Another option is to let it simmer longer; just keep stirring to prevent it from sticking to the bottom of the pan!
Can I use stock instead of broth?
Definitely! Stock can add a deeper flavor to your gravy, so feel free to use it in place of broth. Just remember that stock tends to be richer and may result in a slightly different flavor profile, but it’s still going to taste amazing!
What if my gravy turns out lumpy?
Oh no! Lumpy gravy can happen, but it’s easily fixable. If you find yourself in this situation, don’t panic. Just pour the gravy through a fine-mesh strainer into a clean saucepan to catch those pesky lumps. You can also use an immersion blender to smooth it out if you have one on hand. Voilà—smooth gravy in no time!
How do I store leftover brown gravy?
To store leftover brown gravy, let it cool to room temperature, then transfer it to an airtight container. It’ll keep in the refrigerator for about 3-4 days. If you want to save it longer, freeze it in freezer-safe bags or containers—just remember to leave some space for expansion. It can last in the freezer for 2-3 months, so you can enjoy it later!
With these FAQs answered, you’re all set to tackle any brown gravy challenges that come your way. Happy cooking!
Print
Brown Gravy: 6 Steps to Heavenly Comfort Food
- Total Time: 15 minutes
- Yield: 2 cups 1x
- Diet: Gluten Free
Description
A rich and savory brown gravy perfect for enhancing your meals.
Ingredients
- 2 tablespoons butter
- 2 tablespoons all-purpose flour
- 2 cups beef broth
- 1 tablespoon soy sauce
- Salt to taste
- Pepper to taste
Instructions
- Melt butter in a saucepan over medium heat.
- Stir in flour and cook until browned.
- Add beef broth slowly, whisking to prevent lumps.
- Stir in soy sauce.
- Season with salt and pepper.
- Simmer until thickened.
Notes
- For a thicker gravy, add more flour.
- Use chicken or vegetable broth for different flavors.
- Serve over mashed potatoes or meat.
- Prep Time: 5 minutes
- Cook Time: 10 minutes
- Category: Sauce
- Method: Stovetop
- Cuisine: American
Nutrition
- Serving Size: 1/4 cup
- Calories: 50
- Sugar: 1g
- Sodium: 400mg
- Fat: 2g
- Saturated Fat: 1g
- Unsaturated Fat: 1g
- Trans Fat: 0g
- Carbohydrates: 6g
- Fiber: 0g
- Protein: 2g
- Cholesterol: 5mg
Keywords: brown gravy, sauce, beef gravy