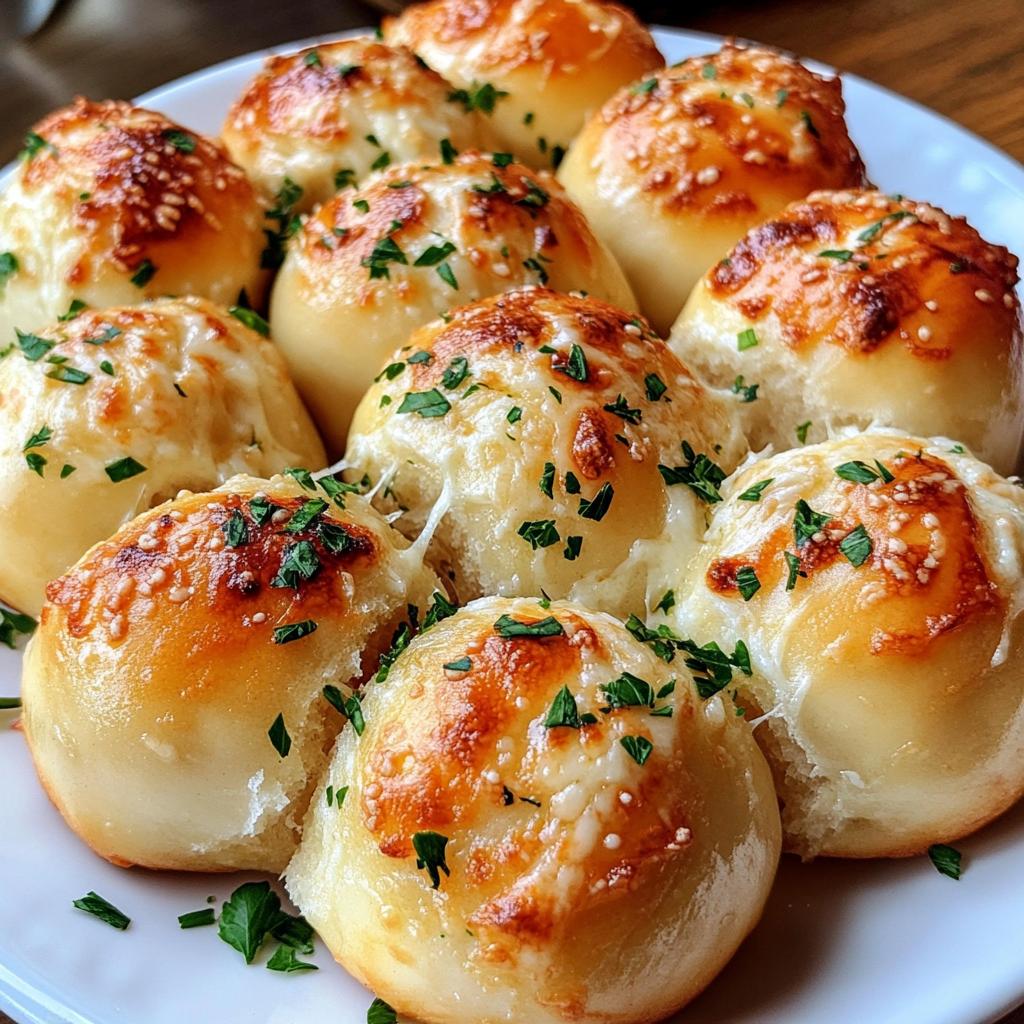
Oh my goodness, let me tell you about these cheesy garlic bombs! They are pure little bites of heaven, and I can’t help but get excited every time I make them. Imagine fluffy rolls bursting with gooey melted cheese and a punch of garlic flavor—that’s what you get with these delightful treats. They’re perfect for snacking, whether you’re hosting friends for game night or just enjoying a cozy evening at home. Trust me, once you pop one in your mouth, you’ll be reaching for another!
I remember the first time I made cheesy garlic bombs; it was a chilly evening, and I wanted something warm and comforting. The aroma of garlic wafting through the kitchen had everyone flocking to the oven, eagerly waiting for that golden-brown goodness to come out. They disappeared in minutes! I love how simple yet satisfying these little bites are. And the best part? You can whip them up in just about 35 minutes! So, let’s dive into making your own cheesy garlic bombs that will have everyone coming back for seconds (or thirds!).
Ingredients List
Gathering the right ingredients is the first step to making your cheesy garlic bombs absolutely delicious. Here’s what you’ll need:
- 1 cup all-purpose flour: This is the base of your dough, giving it structure and a light texture.
- 1 teaspoon baking powder: Essential for helping your cheesy garlic bombs rise and become fluffy.
- 1/2 teaspoon salt: A must for enhancing the flavors of the other ingredients.
- 1/4 cup butter, melted: This adds richness and helps create that tender, melt-in-your-mouth quality.
- 1/2 cup milk: It hydrates the dough and gives it a lovely softness.
- 1 cup mozzarella cheese, shredded: The star of the show! It melts beautifully and oozes out with every bite.
- 2 cloves garlic, minced: Fresh garlic brings that robust flavor that makes these bombs irresistible.
- 1/4 cup parsley, chopped: This adds a fresh, vibrant touch and a pop of color to your cheesy delights.
Make sure to have everything prepped and ready to go—once you start mixing, you’ll want to move quickly to get those cheesy garlic bombs into the oven!
How to Prepare Cheesy Garlic Bombs
Preheat the Oven
First things first, you’ll want to preheat your oven to 375°F (190°C). Preheating is super important because it helps your cheesy garlic bombs rise and bake evenly. Trust me, there’s nothing worse than biting into a cute little bomb that’s raw inside! So go ahead and turn that oven on while you gather your ingredients. This way, it’ll be nice and hot by the time you’re ready to pop those beauties in.
Mix Dry Ingredients
In a large mixing bowl, combine your all-purpose flour, baking powder, and salt. I like to whisk them together thoroughly to ensure everything is evenly distributed. This step is crucial because you don’t want pockets of baking powder or salt in your cheesy garlic bombs! Just a few quick whisks will do the trick. The mixture should be light and fluffy, ready to welcome the wet ingredients.
Combine Wet Ingredients
Now, let’s move on to the wet ingredients. In the same bowl, add the melted butter and milk to your dry mixture. This is where the magic starts to happen! Use a spatula or wooden spoon to mix everything together until it’s just combined. You want a soft, slightly sticky dough, so don’t overmix it. A few lumps are totally okay! It’s all about keeping that light texture.
Fold in Cheese and Seasoning
Next up, we’re adding in the star players—mozzarella cheese, minced garlic, and chopped parsley. Gently fold them into the dough using a spatula. Now, folding is key here; you want to incorporate these goodies without squishing the dough too much. I like to lift the dough from the bottom of the bowl over the cheese and garlic—this way, everything gets mixed evenly while maintaining that airy consistency.
Shape and Bake
Now for the fun part! Grab a spoon and scoop out small amounts of dough, shaping them into balls about the size of a golf ball. Place them on a baking sheet lined with parchment paper, leaving a bit of space between each one. This gives them room to puff up beautifully! Pop them in your preheated oven and bake for about 15-20 minutes until they’re golden brown and irresistible. You’ll know they’re done when they smell heavenly and have that perfect golden hue. Don’t forget to let them cool for a minute before serving—if you can resist the urge to dive in right away!
Why You’ll Love This Recipe
There are so many reasons to adore these cheesy garlic bombs! Here are just a few that keep me coming back for more:
- Irresistibly Cheesy: Each bite is packed with gooey, melted mozzarella that stretches beautifully, making you crave just one more.
- Quick and Easy: With just 35 minutes from start to finish, you can whip these up for a last-minute snack or surprise guests without breaking a sweat!
- Perfect for Any Occasion: Whether it’s game night, family gatherings, or a cozy movie marathon, these little bombs are a hit with everyone.
- Fresh Garlic Flavor: The minced garlic elevates the taste, giving a savory kick that perfectly complements the cheese. You’ll be the star of the kitchen!
- Customizable: Feel free to add your favorite herbs or spices to the mix. Italian seasoning, chili flakes, or even a dash of parmesan can take these bombs to the next level!
- Leftover Friendly: If you happen to have any leftovers (which is rare!), they reheat beautifully in the oven, keeping that delightful texture intact.
Trust me, once you try these cheesy garlic bombs, they’ll become a staple in your home too!
Tips for Success
Making cheesy garlic bombs is a breeze, but a few little tips can take your game to the next level and ensure perfect results every time. Let me share some of my favorite tricks to help you avoid common pitfalls and elevate your cheesy experience!
- Don’t Skip the Preheating: Seriously, preheating your oven is crucial! This ensures your cheesy garlic bombs bake evenly and rise beautifully. If the oven isn’t hot enough, you might end up with doughy centers—yikes!
- Measure Ingredients Accurately: Baking is a science, so make sure to measure your flour and other dry ingredients properly. I like to spoon the flour into the measuring cup and level it off with a knife. This prevents packing, which can make your bombs dense.
- Use Fresh Ingredients: Fresh garlic and herbs make a world of difference! The flavor is so much better than dried or jarred versions. Plus, fresh ingredients bring out the best in your cheesy garlic bombs, making them truly irresistible.
- Experiment with Cheese: While mozzarella is fantastic, don’t be afraid to mix it up! Try adding in some cheddar or pepper jack for a kick. Just keep in mind that different cheeses have varying moisture contents, so adjust the recipe accordingly if you go wild!
- Watch the Baking Time: Ovens can vary, so keep an eye on your cheesy garlic bombs as they bake. You want them golden brown, but if they’re browning too quickly, cover them loosely with aluminum foil to prevent burning while they finish cooking.
- Let Them Cool a Bit: I know it’s hard to resist, but let your cheesy garlic bombs cool for a minute or two before diving in. This helps the cheese set slightly, so you don’t end up with a gooey mess all over your hands!
With these tips in your back pocket, you’re all set to create cheesy garlic bombs that will wow your family and friends. Happy baking!
Nutritional Information Disclaimer
Before you dig into those delicious cheesy garlic bombs, I want to share a quick note about the nutritional information. Keep in mind that nutrition can vary based on the ingredients and brands you use, so the values provided here are just estimates. For a typical serving size of one cheesy garlic bomb, you can expect around:
- Calories: 150
- Fat: 8g
- Protein: 4g
- Carbohydrates: 14g
These values may change depending on the specific ingredients you choose, so it’s always a good idea to double-check if you’re tracking your intake closely. Enjoy every cheesy bite, knowing you’re indulging in something delicious yet satisfying!
Storage & Reheating Instructions
After whipping up a batch of those scrumptious cheesy garlic bombs, you might find yourself with a few leftovers (if you’re lucky!). Storing them properly will keep that delightful texture and flavor intact, so let’s go over how to do it!
To store your cheesy garlic bombs, simply place them in an airtight container. I like to use a glass container with a tight-fitting lid, but any airtight option will do. Make sure they cool completely before sealing them up—this helps prevent any unwanted moisture from making them soggy. You can keep them at room temperature for a day, or pop them in the fridge if you want them to last a bit longer, usually up to 3-4 days.
When it comes to reheating, the oven is your best friend! Preheat your oven to 350°F (175°C) and place the cheesy garlic bombs on a baking sheet lined with parchment paper. Bake them for about 5-10 minutes, or until they’re warmed through and that gooey cheese is nice and melty again. This way, you’ll get that freshly baked texture back, which is so much better than using the microwave (trust me, it can make them chewy!).
If you’re in a pinch and need a quick reheat, the microwave will work, but be careful! Heat them in short bursts of about 15-20 seconds to avoid turning them into rubbery little bombs. Whatever you do, don’t forget to enjoy them warm—because let’s be honest, cheesy garlic bombs are best right out of the oven!
FAQ Section
Q1. Can I use a different type of cheese in cheesy garlic bombs?
Absolutely! While mozzarella is my go-to for its gooey, melt-in-your-mouth texture, you can definitely mix it up. Cheddar adds a nice sharpness, while pepper jack brings a spicy kick. Just remember that different cheeses have different moisture levels, so you might need to adjust your dough a bit if you go wild!
Q2. How do I prevent my cheesy garlic bombs from being doughy inside?
Great question! Preheating your oven to the correct temperature is key to ensuring even baking, which helps avoid that doughy center. Additionally, make sure to bake them until they are golden brown and not just lightly colored. If you’re unsure, you can do a toothpick test in the center—if it comes out clean, they’re good to go!
Q3. Can I prepare the dough ahead of time?
Yes, you can! If you want to prep ahead, just make the dough and shape it into balls. Then, place them in an airtight container and store them in the fridge for up to 24 hours before baking. Just be sure to let them sit at room temperature for a bit before popping them in the oven, so they bake evenly.
Q4. What can I serve with cheesy garlic bombs?
These cheesy garlic bombs are super versatile! They make a fantastic appetizer on their own, but you can also pair them with marinara sauce for dipping or a fresh garden salad to balance the richness. They’re perfect for game nights or as part of a spread for any gathering!
Q5. How do I reheat leftover cheesy garlic bombs?
To keep that delightful texture, I recommend reheating them in the oven. Just preheat to 350°F (175°C) and bake for about 5-10 minutes. This will ensure they’re warm and the cheese is melty again. If you’re in a hurry, the microwave works too, but be cautious—heat in short bursts to avoid rubbery bombs!

Cheesy Garlic Bombs: 35 Minutes to Irresistible Bliss
- Total Time: 35 minutes
- Yield: 12 servings 1x
- Diet: Vegetarian
Description
Cheesy garlic bombs are delicious bite-sized rolls filled with gooey cheese and garlic flavor, perfect for snacking.
Ingredients
- 1 cup all-purpose flour
- 1 teaspoon baking powder
- 1/2 teaspoon salt
- 1/4 cup butter, melted
- 1/2 cup milk
- 1 cup mozzarella cheese, shredded
- 2 cloves garlic, minced
- 1/4 cup parsley, chopped
Instructions
- Preheat your oven to 375°F (190°C).
- In a bowl, mix flour, baking powder, and salt.
- Add melted butter and milk to the dry ingredients. Stir until combined.
- Fold in mozzarella cheese, garlic, and parsley.
- Shape the mixture into small balls and place on a baking sheet.
- Bake for 15-20 minutes until golden brown.
- Serve warm.
Notes
- Store leftovers in an airtight container.
- Reheat in the oven for best texture.
- Prep Time: 15 minutes
- Cook Time: 20 minutes
- Category: Appetizer
- Method: Baking
- Cuisine: American
Nutrition
- Serving Size: 1 bomb
- Calories: 150
- Sugar: 1g
- Sodium: 200mg
- Fat: 8g
- Saturated Fat: 5g
- Unsaturated Fat: 2g
- Trans Fat: 0g
- Carbohydrates: 14g
- Fiber: 0g
- Protein: 4g
- Cholesterol: 20mg
Keywords: cheesy garlic bombs