Oh, the magic of Christmas baking! There’s something so special about filling the kitchen with the warm, sweet aroma of cake baking in the oven, especially when you’re whipping up a festive Christmas bento cake. This delightful creation is not only a treat for the taste buds but also a feast for the eyes! I love how the vibrant red and green colors come together, making it the perfect centerpiece for holiday gatherings. It’s like unwrapping a present, each slice revealing more of that joyful spirit we all cherish during this season.
What makes this recipe even more special to me is the memories attached to it. I remember baking this with my grandma every Christmas, laughing and decorating together while the snow fell softly outside. Now, I get to share this tradition with my own family, creating new memories as we enjoy each delicious slice. Trust me, this Christmas bento cake design is bound to become a beloved favorite in your home, too!
Ingredients List
To bring this festive Christmas bento cake to life, you’ll need a few key ingredients that come together for a delightful treat. Gather:
- 4 cups of cake flour – sifted for a light texture
- 2 cups of granulated sugar – sweet perfection!
- 1 cup of unsalted butter – softened, so it’s creamy
- 6 large eggs – room temperature for easy mixing
- 2 cups of whole milk – adds moisture and richness
- 2 tablespoons of baking powder – for that lovely rise
- 1 tablespoon of vanilla extract – because who doesn’t love vanilla?
- Red and green food coloring – to create that festive flair
- Buttercream frosting – for layering and decorating
- Decorative sprinkles – to finish with a sprinkle of joy!
Make sure you have everything ready before you start, and let the holiday baking fun begin!
How to Prepare Instructions
Now that you’ve gathered your ingredients, let’s dive into the fun part – bringing this Christmas bento cake to life! Follow these steps carefully, and you’ll have a stunning cake that’s sure to impress everyone at your holiday celebration.
- Preheat your oven: First things first, preheat your oven to 350°F (175°C). This ensures your cake bakes evenly and beautifully.
- Cream the butter and sugar: In a large mixing bowl, cream together the softened unsalted butter and granulated sugar until the mixture becomes light and fluffy. This step is crucial, as it incorporates air into the batter, giving your cake that perfect texture.
- Add the eggs: Crack in the six large eggs, one at a time, mixing well after each addition. This helps to fully combine the ingredients and create a smooth batter.
- Mix the dry ingredients: In a separate bowl, combine the sifted cake flour and baking powder. Gradually add this dry mixture to your wet ingredients, mixing until just combined. Don’t overmix; we want a tender cake!
- Incorporate the milk and vanilla: Stir in the milk and vanilla extract until the batter is smooth and creamy.
- Color the batter: Now, separate the batter into two bowls. Dye one bowl red and the other green using food coloring. You can adjust the intensity based on your festive preference!
- Pour and bake: Pour the batters into prepared cake pans, alternating colors for a fun swirl effect if you like. Bake in the preheated oven for 25-30 minutes, or until a toothpick inserted into the center comes out clean.
- Cool the cakes: Once baked, remove the pans from the oven and allow the cakes to cool in the pans for about 10 minutes. Then, transfer them to a wire rack to cool completely.
- Layer and frost: Once cooled, layer your cakes with buttercream frosting in between and on top. Don’t forget to go wild with those decorative sprinkles!
Step-by-Step Baking Process
Let’s break down the baking process a bit more, shall we? The creaming of the butter and sugar is where the magic begins – you want it fluffy and light. I usually take about 3-5 minutes to get it just right. As you add each egg, make sure it’s fully incorporated before moving on; it makes a world of difference!
When mixing the dry ingredients, be gentle. Overmixing can lead to a dense cake, and we want that light and airy texture. When it comes to adding the milk and vanilla, take a moment to savor that lovely aroma. It’s one of my favorite parts! And don’t rush the cooling process; letting your cakes cool completely is key to a successful layer – trust me, no one likes a melty frosting disaster!
Once you’ve layered your cakes with frosting, step back and admire your creation. It’s not just a cake; it’s a work of art made with love. Now, let’s get to the best part – enjoying every slice with friends and family!
Nutritional Information Section
Now, let’s talk about the nutrition of this festive Christmas bento cake! Each slice brings a delightful combination of flavors and a bit of indulgence. Just remember, the nutritional values can vary based on the specific ingredients and brands you choose, so these numbers are approximate. For reference, one slice contains about 350 calories, with 25 grams of sugar and 15 grams of fat. It’s a sweet treat, perfect for celebrating the season, but as with all desserts, moderation is key. Enjoy it with your loved ones, and savor every delicious bite!
Why You’ll Love This Recipe
- Festive Appearance: The vibrant red and green layers make this cake a stunning centerpiece for any holiday gathering.
- Easy to Make: With straightforward steps, even novice bakers can whip up this delightful treat in no time.
- Fun for Everyone: Decorating the cake with buttercream frosting and sprinkles is a joy, making it a perfect activity for family and friends.
- Deliciously Moist: The combination of milk and butter ensures each slice is rich, tender, and oh-so-satisfying.
- A Sweet Tradition: This Christmas bento cake is perfect for creating lasting memories with loved ones, just like I did with my grandma!
Tips for Success
To ensure your Christmas bento cake turns out perfectly, here are some handy tips I swear by! First, always use room temperature ingredients; this helps to create a smooth batter that’s easy to mix. Next, when coloring your batter, start with just a few drops of food coloring and add more until you reach your desired shade – it’s easier to add than to take away! Also, don’t skip the cooling time – letting the cakes cool completely prevents your frosting from melting. Finally, feel free to get creative with your sprinkles; a mix of shapes and sizes adds a fun festive touch!
Variations
If you want to switch things up with your Christmas bento cake design, there are so many fun options to explore! For a refreshing twist, try adding a hint of peppermint extract to the batter for a minty flavor that screams holiday cheer. You can also swap out the food coloring for other festive hues like gold and silver or even a winter wonderland white with coconut flakes on top!
Feeling adventurous? Try different cake flavors like chocolate or red velvet instead of classic vanilla. The possibilities are endless, and it’s a great way to cater to different tastes at your holiday gatherings. Just remember, no matter how you decorate or flavor it, the joy of baking together is what truly makes this cake special!
Serving Suggestions
To elevate your Christmas bento cake design and create a truly festive experience, consider pairing it with some delightful accompaniments! A dollop of freshly whipped cream adds a light and airy touch that complements the cake’s sweetness beautifully. You could also serve it alongside a warm spiced apple cider or a rich hot chocolate for that cozy winter vibe.
For an extra special treat, why not make a simple fruit salad with seasonal fruits like pomegranate seeds, oranges, and cranberries? It adds a refreshing contrast to the cake. And of course, don’t forget to have some holiday cookies on the side for a joyful dessert spread that everyone will love!
Storage & Reheating Instructions
To keep your Christmas bento cake fresh and delicious, make sure to store any leftovers in an airtight container at room temperature for up to three days. If you want to keep it longer, you can refrigerate it, but be aware that it may dry out a bit. Just be sure to bring it back to room temperature before serving for the best texture!
If you decide to freeze it, wrap individual slices in plastic wrap and then place them in a freezer-safe bag. When you’re ready to enjoy a slice, simply thaw it in the fridge overnight and then let it sit at room temperature for about 30 minutes before indulging in that festive goodness again!
Print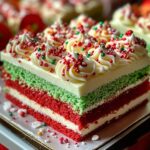
Christmas Bento Cake Design: 7 Steps to Festive Delight
- Total Time: 1 hour
- Yield: 12 servings 1x
- Diet: Vegetarian
Description
A festive bento cake designed for Christmas celebration.
Ingredients
- 4 cups cake flour
- 2 cups sugar
- 1 cup unsalted butter
- 6 eggs
- 2 cups milk
- 2 tablespoons baking powder
- 1 tablespoon vanilla extract
- Red and green food coloring
- Buttercream frosting
- Decorative sprinkles
Instructions
- Preheat the oven to 350°F (175°C).
- In a bowl, cream butter and sugar together.
- Add eggs, one at a time, mixing well.
- Combine flour and baking powder, then add to the mixture.
- Stir in milk and vanilla extract.
- Separate batter into two bowls, dye one red and the other green.
- Pour the batters into prepared cake pans.
- Bake for 25-30 minutes. Cool completely.
- Layer cakes with buttercream frosting.
- Decorate with festive sprinkles.
Notes
- Use a bento box for serving.
- Adjust food coloring for desired intensity.
- Store leftovers in an airtight container.
- Prep Time: 30 minutes
- Cook Time: 30 minutes
- Category: Dessert
- Method: Baking
- Cuisine: American
Nutrition
- Serving Size: 1 slice
- Calories: 350
- Sugar: 25g
- Sodium: 200mg
- Fat: 15g
- Saturated Fat: 9g
- Unsaturated Fat: 4g
- Trans Fat: 0g
- Carbohydrates: 50g
- Fiber: 1g
- Protein: 5g
- Cholesterol: 60mg
Keywords: christmas bento cake design