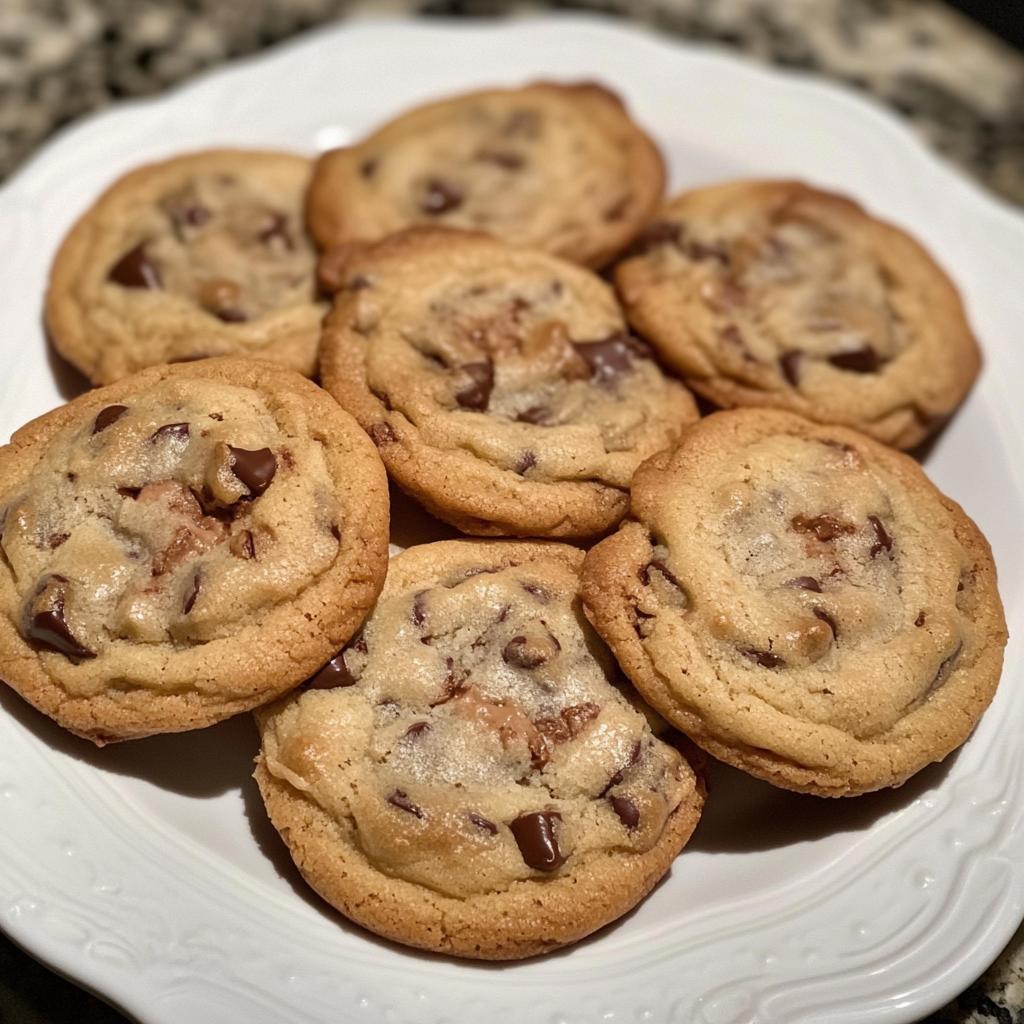
Ah, the holiday season! It’s that magical time of year when everything feels a little brighter, and the scent of freshly baked cookies wafts through the air. I can’t help but smile when I think about gifting my beloved Christmas cookie gifts. There’s something incredibly special about sharing homemade treats with friends and family, and these cookies are my go-to recipe. They’re soft, chewy, and packed with chocolatey goodness—perfect for spreading joy!
Every time I bake these cookies, it feels like I’m wrapping up love in every batch. The best part? They’re so easy to make, and you can whip them up in just about 30 minutes! I love to package them in cute tins or festive boxes, adding a personal touch with colorful ribbons. Whether you’re surprising a neighbor, a co-worker, or your favorite teacher, these cookies are sure to bring smiles. Plus, the joy of baking together with loved ones creates unforgettable memories. Trust me, there’s no better gift than a batch of warm cookies straight from the oven, shared with those you care about. So, let’s get started on making these delightful Christmas cookie gifts that will surely delight everyone on your list!
Ingredients List
To make these delightful Christmas cookie gifts, you’ll need the following ingredients:
- 2 3/4 cups all-purpose flour
- 1 teaspoon baking soda
- 1/2 teaspoon salt
- 1 cup unsalted butter, softened
- 1 1/2 cups white sugar
- 1 cup packed brown sugar
- 2 large eggs
- 2 teaspoons vanilla extract
- 2 cups chocolate chips
Make sure your butter is softened to room temperature; it helps create that perfectly creamy texture when you mix it with the sugars. And don’t forget to measure your flour correctly—spoon it into your measuring cup and level it off for the best results! Happy baking!
How to Prepare Instructions
Okay, let’s dive into making these scrumptious Christmas cookie gifts! Follow these steps, and I promise you’ll be rewarded with cookies that are soft, chewy, and absolutely delightful.
Preheat the Oven
First things first, preheating your oven is crucial! Set it to 375°F (190°C). This step is important because a well-preheated oven ensures that your cookies bake evenly. Trust me, no one wants a cookie that’s burnt on the edges and gooey in the middle! Preheat while you gather your ingredients, so you’re ready to go when it’s time to bake.
Mix the Dry Ingredients
Now, grab a small bowl and whisk together your flour, baking soda, and salt. This helps to evenly distribute the baking soda and salt throughout the flour, preventing any clumping. You want a uniform mixture before it goes into the batter, so be thorough here! Once combined, set it aside for later.
Cream the Butter and Sugars
In a large mixing bowl, it’s time to cream together the softened unsalted butter, white sugar, and brown sugar. I like to use a hand mixer for this—it makes the job easier and faster! Beat them together until the mixture becomes light and fluffy, which usually takes about 2-3 minutes. This step is essential because incorporating air into the butter helps give your cookies that lovely, soft texture we all love.
Combine Wet Ingredients
Next, beat in the eggs, one at a time, followed by the vanilla extract. Make sure each egg is well incorporated before adding the next. This not only adds moisture but also binds everything together beautifully. You’ll want a smooth and creamy consistency at this point—just look at that gorgeous mixture!
Blend in the Dry Ingredients
Now it’s time to gradually blend in those dry ingredients. I recommend adding about a third of the dry mixture at a time, mixing gently until just combined before adding more. This method helps prevent overmixing, which can lead to tougher cookies. You want to see a few flour streaks—don’t worry if it’s not fully mixed at first!
Stir in the Chocolate Chips
Finally, fold in those delicious chocolate chips! I usually use a spatula or a wooden spoon for this part, gently stirring until the chips are evenly distributed throughout the cookie dough. This is when the dough starts to look irresistible—just imagine the gooey chocolate in every bite!
Bake the Cookies
Drop rounded spoonfuls of dough onto ungreased cookie sheets, leaving enough space between them to allow for spreading. Bake in your preheated oven for 9 to 11 minutes. Keep an eye on them! You’ll know they’re done when the edges are golden brown and the centers look set but still soft. Let them cool on the baking sheet for a few minutes before transferring them to a wire rack to cool completely. And there you have it—delicious, homemade cookies ready to be shared and enjoyed!
Nutritional Information
When it comes to enjoying these delightful Christmas cookie gifts, it’s good to know what you’re indulging in! Here’s a general breakdown of the nutritional content per cookie. Keep in mind that these values can vary based on your specific ingredients and portion sizes, but this will give you a solid idea:
- Calories: 200
- Total Fat: 10g
- Saturated Fat: 5g
- Trans Fat: 0g
- Cholesterol: 30mg
- Sodium: 150mg
- Total Carbohydrates: 25g
- Dietary Fiber: 1g
- Total Sugars: 15g
- Protein: 2g
These cookies are a sweet treat, and while they’re perfect for gifting, it’s nice to keep track of what you’re munching on during the festive season. Enjoy them as a special treat and share the joy of homemade goodness with those you love!
Why You’ll Love This Recipe
- Quick to Make: You can whip up a batch of these delicious cookies in just about 30 minutes! Perfect for those last-minute gifting needs or holiday baking sessions.
- Easy to Customize: Feel free to swap out chocolate chips for your favorite nuts, dried fruits, or even different flavored chips! Want to make it festive? Try adding some crushed peppermint or sprinkles for a seasonal touch.
- Perfect for Gifting: These cookies make delightful Christmas cookie gifts. Package them in cute tins or boxes, and you’ll have a thoughtful present that friends and family will adore.
- Freezes Well: Make a double batch and freeze some for later! Just pop them in the oven when you’re craving a fresh cookie, and you’ll have warm treats in no time.
- Irresistibly Delicious: With their soft, chewy texture and rich chocolate flavor, these cookies are sure to be a hit at any holiday gathering or cozy night in.
- Family-Friendly Fun: Baking these cookies is a wonderful activity to enjoy with family or friends. Kids love to help out, and it creates sweet memories that you’ll cherish for years to come.
Tips for Success
Making the perfect Christmas cookie gifts is all about a few key tips and tricks that will ensure you achieve cookie perfection every time. Here are my favorite nuggets of wisdom to help you along the way:
- Use Room Temperature Ingredients: Make sure your butter and eggs are at room temperature before you start mixing. This helps them blend together more smoothly, resulting in a better texture for your cookies. Just take them out of the fridge about 30 minutes before you begin.
- Don’t Overmix the Dough: Once you add the dry ingredients to the wet, mix until just combined. Overmixing can develop gluten, leading to tougher cookies. You want that soft, chewy texture, so be gentle!
- Chill the Dough for Extra Flavor: If you have time, chill your cookie dough for about 30 minutes before baking. This not only enhances the flavor but also helps the cookies maintain their shape during baking. Trust me, it’s worth the wait!
- Uniform Cookie Sizes: For even baking, use a cookie scoop or measuring spoon to portion out your dough. This way, all your cookies will bake at the same rate, leading to a perfect batch every time!
- Watch the Baking Time: Keep a close eye on your cookies as they bake. Ovens can vary, so start checking around the 9-minute mark. You want them to be golden brown around the edges, with a slightly soft center—don’t worry, they’ll firm up as they cool!
- Let Them Cool: Allow your cookies to cool on the baking sheet for a few minutes before transferring them to a wire rack. This helps them set and prevents them from breaking apart. Patience is key here!
- Experiment with Flavors: Don’t be afraid to get creative! Swap out the chocolate chips for white chocolate, butterscotch, or even add some festive spices like cinnamon or nutmeg to the dough for a holiday twist. Make it your own!
- Share the Love: Remember, these cookies are meant to be shared! So, once they’re baked and cooled, package them up beautifully and spread some holiday cheer. Your family and friends will absolutely love these thoughtful Christmas cookie gifts.
With these tips in your back pocket, I know you’ll create a batch of cookies that not only taste amazing but also warm the hearts of everyone who receives them. Happy baking!
Storage & Reheating Instructions
Once you’ve baked your delicious Christmas cookie gifts, it’s important to store them properly to keep them fresh and tasty! Here’s how to ensure your cookies stay delicious for as long as possible:
First off, let your cookies cool completely on a wire rack. This step is crucial because if you store them while they’re still warm, they can become soggy or lose their delightful texture. Once they’re cooled, grab an airtight container—this is key! Layer your cookies in the container with parchment paper between each layer to prevent them from sticking together.
If you find yourself with leftover cookies (which I always hope for!), you can keep them at room temperature for about a week. Just make sure they’re stored in a cool, dry place away from direct sunlight. For longer storage, these cookies freeze beautifully! Simply place them in a freezer-safe bag or container, and they’ll last for up to three months. When you’re ready to enjoy them, just pull out however many you want and let them sit at room temperature for about 10-15 minutes, or pop them in the microwave for about 10 seconds. They’ll taste like they just came out of the oven!
If you prefer to enjoy them warm, reheating is super simple. Preheat your oven to 350°F (175°C) and place your cookies on a baking sheet. Heat them for about 5-7 minutes until they’re warm and slightly softened. You can also use the microwave for a quicker fix—just be cautious not to overdo it! A few seconds is all you need to bring back that gooey, melty chocolate goodness.
With these storage and reheating tips, you’ll always have delicious cookies on hand to enjoy or share with your loved ones. Happy baking, and enjoy your delightful Christmas cookie gifts!
FAQ Section
Got questions about making these delicious Christmas cookie gifts? Don’t worry, I’ve got you covered! Here are some common questions and answers that will help you on your cookie-making journey:
- Q1: Can I use different types of chocolate chips?
Absolutely! This recipe is super flexible. Feel free to swap in dark chocolate, white chocolate, or even milk chocolate chips. You can get creative and mix different types too—just think of how amazing that will taste! - Q2: What if I don’t have unsalted butter?
If you only have salted butter on hand, you can still use it! Just reduce the amount of added salt in the recipe to about 1/4 teaspoon to balance it out. Your cookies will still turn out delicious! - Q3: Can I make the dough ahead of time?
Yes! You can prepare the cookie dough in advance and store it in the fridge for up to 3 days. Just make sure to cover it tightly. You can also freeze the dough for longer storage—just scoop out the cookies and freeze them on a baking sheet before transferring to a freezer bag. When you’re ready to bake, you can bake them straight from the freezer; just add an extra minute or two to the baking time. - Q4: How do I prevent my cookies from spreading too much?
To keep your cookies from spreading, make sure your butter is softened but not melted. Chilling the dough for about 30 minutes before baking can also help maintain their shape. Plus, using a cookie scoop to portion the dough ensures uniform sizes, which helps them bake evenly! - Q5: What’s the best way to package these cookies for gifting?
I love to use festive tins or clear cellophane bags tied with a colorful ribbon! You can also layer them with parchment paper in a cute box to keep them from sticking together. Adding a little holiday card with a personal note is a lovely touch that makes your Christmas cookie gifts even more special! - Q6: Can I substitute any ingredients to make these cookies healthier?
Definitely! You can substitute half of the all-purpose flour with whole wheat flour for added fiber, or use coconut sugar instead of white and brown sugars for a lower glycemic option. Just keep in mind that it may change the texture slightly, but they’ll still be delicious!
If you have any other questions or tips to share, feel free to reach out! I love hearing from fellow bakers, and together we can make the happiest holiday treats. Enjoy your baking adventures with these delightful Christmas cookie gifts!
Print
Delightful Christmas Cookie Gifts to Spread Joy and Love
- Total Time: 30 minutes
- Yield: 24 cookies 1x
- Diet: Vegetarian
Description
Delicious cookies perfect for gifting during the holiday season.
Ingredients
- 2 3/4 cups all-purpose flour
- 1 teaspoon baking soda
- 1/2 teaspoon salt
- 1 cup unsalted butter, softened
- 1 1/2 cups white sugar
- 1 cup packed brown sugar
- 2 large eggs
- 2 teaspoons vanilla extract
- 2 cups chocolate chips
Instructions
- Preheat oven to 375°F (190°C).
- In a small bowl, mix flour, baking soda, and salt.
- In a large bowl, cream together butter, white sugar, and brown sugar.
- Beat in eggs and vanilla.
- Gradually blend in the dry ingredients.
- Stir in chocolate chips.
- Drop by rounded spoonfuls onto ungreased cookie sheets.
- Bake for 9 to 11 minutes or until golden brown.
Notes
- Store cookies in an airtight container.
- Customize with different types of chips or nuts.
- These cookies freeze well.
- Prep Time: 20 minutes
- Cook Time: 10 minutes
- Category: Dessert
- Method: Baking
- Cuisine: American
Nutrition
- Serving Size: 1 cookie
- Calories: 200
- Sugar: 15g
- Sodium: 150mg
- Fat: 10g
- Saturated Fat: 5g
- Unsaturated Fat: 3g
- Trans Fat: 0g
- Carbohydrates: 25g
- Fiber: 1g
- Protein: 2g
- Cholesterol: 30mg
Keywords: christmas cookie gifts, holiday cookies, cookie recipes