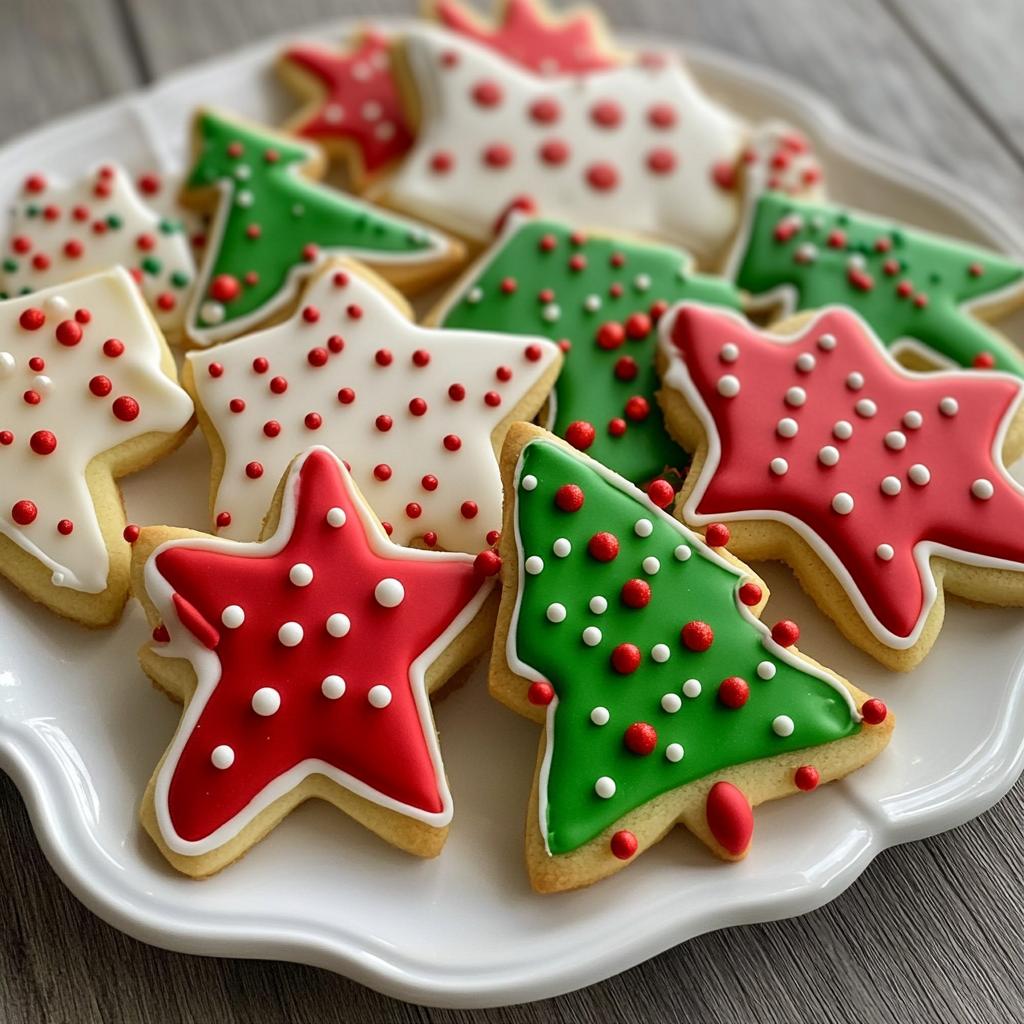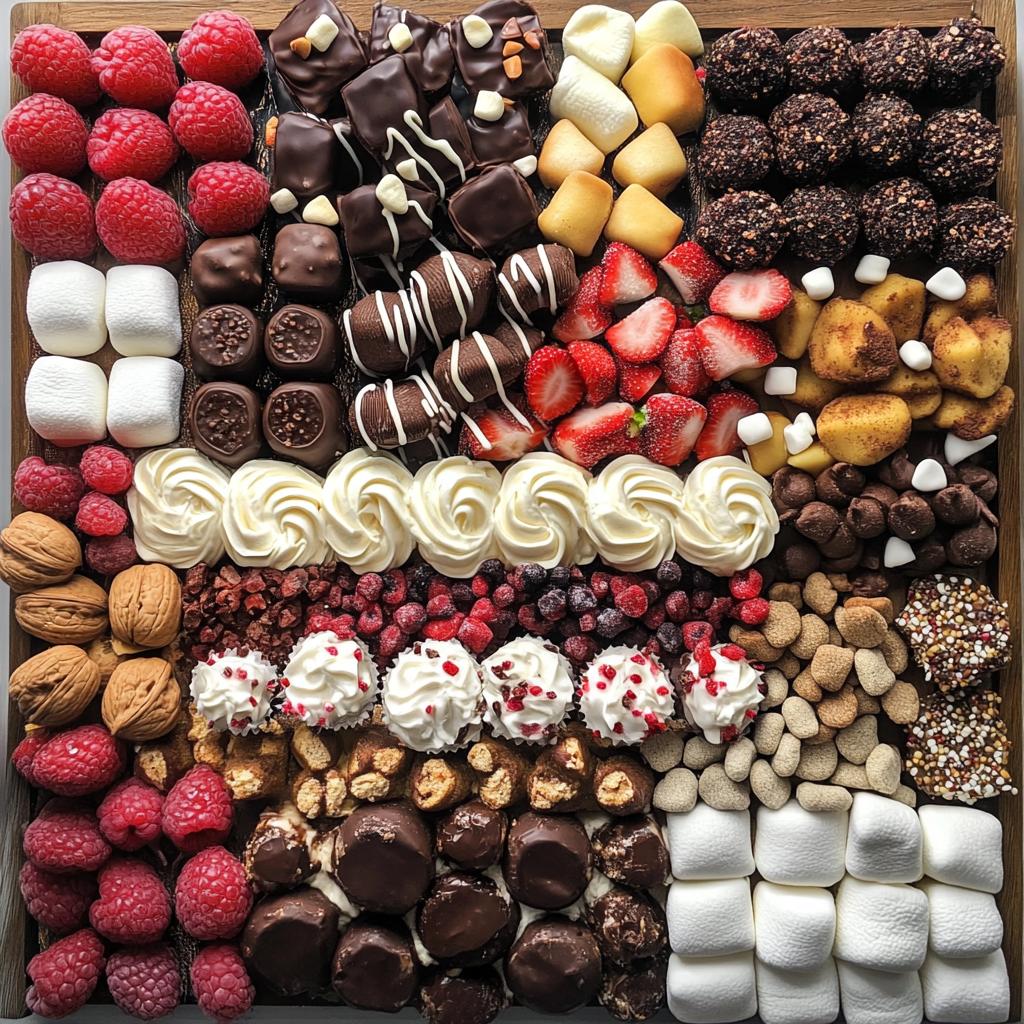
Ah, the holiday season! There’s just something magical about gathering with family and friends, surrounded by twinkling lights and the warm aroma of baked goodies. One of my absolute favorite ways to elevate these joyful celebrations is by creating a stunning Christmas dessert charcuterie board. Trust me, it’s a total showstopper! Picture a beautiful assortment of sweet treats, all arranged artfully for everyone to enjoy. It not only brings a festive flair to your table but also invites guests to indulge in a little bit of everything. I still remember the first time I made one for a family gathering—everyone was so excited to dive in, and the smiles were priceless! So, let’s dive into how you can create your own delightful dessert board that’ll be the talk of the holiday season!
Ingredients for Your Christmas Dessert Charcuterie Board
Creating the perfect Christmas dessert charcuterie board starts with gathering the right ingredients. Each sweet treat plays a vital role in making your board a delightful centerpiece. Here’s what you’ll need:
- Chocolate truffles – 12 pieces: Rich and creamy, these decadent bites are a must-have. You can choose dark, milk, or white chocolate truffles based on your preference.
- Assorted cookies – 24 pieces: Think of a variety, like sugar cookies, gingerbread, and chocolate chip. The mix adds texture and flavor, perfect for sharing!
- Mini cupcakes – 12 pieces: These adorable little treats can be frosted in festive colors. They’re not just cute; they’re a delightful bite-sized addition.
- Dried fruits – 1 cup: Go for a colorful assortment, like apricots, cranberries, and figs. They add a lovely chewiness and natural sweetness.
- Nuts – 1 cup: A mix of almonds, walnuts, and pecans brings a crunchy contrast to the softer treats. Make sure to use unsalted nuts to keep the flavors balanced.
- Marshmallows – 1 cup: Soft and fluffy, these can be regular or flavored. They add a whimsical touch that everyone loves!
- Chocolate-covered pretzels – 1 cup: These provide that perfect salty-sweet combo, making them irresistible. Plus, they add a fun crunch!
- Fresh berries – 1 cup: Use a mix of strawberries, blueberries, and raspberries for a pop of color and freshness. They brighten up the board and are a refreshing bite.
- Whipped cream – 1 cup: A small bowl of whipped cream for dipping is essential! It’s the perfect accompaniment for many of the treats on your board.
Feel free to get creative! You can swap out any of these ingredients for your favorites or seasonal selections. The key is to have a colorful and varied spread that invites everyone to dig in!
How to Assemble a Christmas Dessert Charcuterie Board
Assembling a Christmas dessert charcuterie board is not just about slapping everything together—it’s an art! With just a little bit of planning and a sprinkle of creativity, you’ll have a dessert spread that will wow your guests. Let’s break it down step-by-step so you can create a delightful masterpiece!
Gather Your Ingredients
Before you start, it’s essential to have everything ready and within reach. This makes the assembly process smooth and stress-free. I like to lay out all my ingredients on the counter so I can see what I have. It not only helps me visualize the final arrangement but also ensures I don’t forget any tasty treats! Trust me, nothing is worse than realizing you left out the chocolate truffles at the last minute!
Choose Your Presentation Board
Now, let’s talk about the board! You want to choose something sizable enough to hold all your goodies but also pretty enough to be the star of the show. A large wooden cutting board, a festive platter, or even a marble slab can work wonders. Just make sure it has enough space for all the treats and allows for easy access. Remember, the goal is to create an inviting display that encourages everyone to dig in!
Arrange the Treats
Here comes the fun part—arranging the treats! Start by placing the larger items first, like the assorted cookies and mini cupcakes, in one section of the board. Then, position the chocolate truffles and chocolate-covered pretzels nearby to create balance. This way, the eye is drawn around the board, and you achieve a harmonious look.
Next, create defined sections for the dried fruits and nuts. I love to use small bowls or even just pile them in a corner to keep things tidy. Then, add marshmallows and fresh berries in separate areas, making sure to mix up the colors for a vibrant presentation. Finally, don’t forget that small bowl of whipped cream—it’s essential and adds a nice finishing touch!
Add Final Touches
To elevate your board from great to spectacular, it’s time for the final touches! Consider adding some festive decorations like sprigs of rosemary, edible flowers, or even small ornaments sprinkled around the board. These little details create a whimsical charm that truly captures the holiday spirit. Just remember not to overcrowd the board—let each treat shine on its own! Your guests will appreciate the thought and effort you put into every detail.
Why You’ll Love This Recipe
There’s so much to adore about crafting your own Christmas dessert charcuterie board. Here are just a few reasons why this festive treat is perfect for your holiday gatherings:
- Quick to Prepare: With just 20 minutes of assembly time, you can create an eye-catching dessert spread that looks like it took hours to make!
- Customizable: You can easily swap out ingredients to suit your taste or dietary needs. Whether you want to use gluten-free cookies or add a favorite seasonal treat, the choice is yours!
- Visually Appealing: The colorful array of sweets makes for a stunning centerpiece that will wow your guests and spark joy during the festivities.
- Interactive Experience: It encourages guests to mingle and choose their favorite treats, creating a fun and relaxed atmosphere.
- Minimal Cleanup: Assembling a charcuterie board means less fuss with baking pans and dishes, allowing you to spend more time enjoying the company of loved ones.
Trust me, once you try it, you’ll see why this delightful dessert board becomes a staple for your holiday celebrations!
Nutritional Information Disclaimer
When it comes to the Christmas dessert charcuterie board, it’s important to remember that nutritional information can vary based on the specific ingredients you choose and their quantities. I always recommend checking the labels on packaged items and adjusting portions based on your dietary preferences. While I’ve provided some general information, keep in mind that the numbers are not exact. Enjoy the process of creating your board and feel free to make it your own, knowing that each delicious bite can be a little different!
Tips for a Perfect Christmas Dessert Charcuterie Board
Creating a stunning Christmas dessert charcuterie board is all about the little details and thoughtful choices. Here are some of my favorite pro tips to help you achieve the best results and impress your guests:
- Mix Textures: Aim for a variety of textures to keep things interesting! Pair crunchy nuts with soft marshmallows and chewy dried fruits. This contrast makes every bite exciting and satisfying.
- Seasonal Flavors: Don’t hesitate to incorporate seasonal treats! Think peppermint bark, festive sugar cookies, or even eggnog-flavored goodies. These seasonal flavors will really enhance the holiday spirit.
- Color Coordination: Use a color palette for your board. Arrange ingredients in a way that creates a visual flow—grouping like colors together or creating a rainbow effect keeps the board visually appealing.
- Personal Touch: Add a personal element by including family favorites or treats that hold special memories. It adds warmth and makes your board unique to your family traditions.
- Consider Dietary Restrictions: Keep your guests in mind by including gluten-free or vegan options. You can easily swap regular cookies for gluten-free varieties or choose dairy-free whipped cream for a lighter option.
- Use Height Wisely: Create dimension by using small stands or cake pedestals to elevate certain items. This adds visual interest and prevents everything from looking flat on the board.
- Keep It Balanced: When arranging, think about balance—not just in terms of ingredients but also color and size. This will give a cohesive look to your charcuterie board that feels effortless.
- Prep Ahead: Many items can be prepped in advance! Bake your cookies a day or two before, and store them in an airtight container. This way, you can focus on assembly closer to your gathering time.
With these tips in mind, you’ll be well on your way to crafting a beautiful Christmas dessert charcuterie board that’ll have everyone talking long after the festivities have ended. Happy assembling!
FAQ About Christmas Dessert Charcuterie Board Ideas
If you’re new to creating a Christmas dessert charcuterie board, you might have a few questions bubbling up! Don’t worry—I’ve got you covered with some common queries and my best answers!
- Q: Can I prepare the charcuterie board in advance?
Absolutely! You can prep many of the treats a day or two ahead. Just keep the components stored in airtight containers. Assemble the board a few hours before your gathering to keep everything fresh. - Q: What if I have guests with dietary restrictions?
Great question! Always consider your guests’ needs. You can easily customize your board by including gluten-free cookies, dairy-free whipped cream, or nut-free options. It’s all about making sure everyone feels included! - Q: How can I make my board visually appealing?
Mix different textures and colors to create an eye-catching display. Use small bowls for nuts and dried fruits, and arrange the items in clusters rather than straight lines to keep it inviting and dynamic. - Q: What can I serve with the dessert board?
To enhance the experience, consider pairing your Christmas dessert charcuterie board with a warm drink, like hot cocoa, spiced cider, or even a festive cocktail. It adds a cozy touch to your holiday gathering! - Q: Are there any special tools I need to assemble the board?
No fancy tools required! A large cutting board or platter is perfect. You might want some small bowls for items like nuts and whipped cream, but other than that, your hands and creativity are all you need!
With these answers in your back pocket, you’re all set to impress your friends and family with a fabulous Christmas dessert charcuterie board that’s both delicious and fun to share!
Serving Suggestions
To make your Christmas dessert charcuterie board even more delightful, consider pairing it with a few festive drinks and additional snacks that complement the sweet treats. Here are some ideas to enhance the overall holiday experience:
- Warm Beverages: Serve up cozy cups of hot chocolate topped with whipped cream or marshmallows to echo the sweetness of your board. You could also offer spiced apple cider or a festive eggnog for a seasonal twist!
- Cheese and Charcuterie: For a savory balance, consider adding a small cheese platter alongside your dessert board. A selection of creamy brie, sharp cheddar, and some cured meats can provide a perfect contrast to the sweetness.
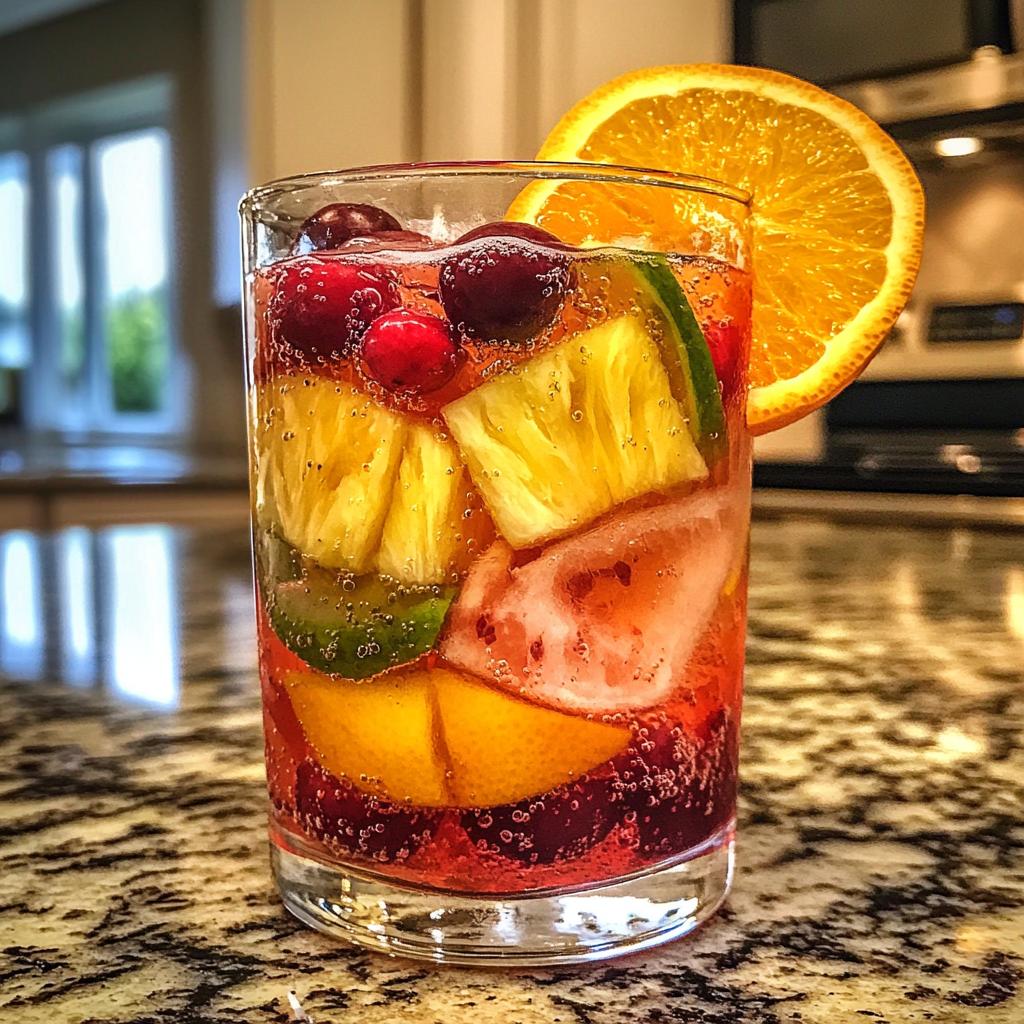
- Fruit Punch or Sparkling Water: A refreshing fruit punch or sparkling water infused with seasonal fruits like oranges and cranberries can cleanse the palate and add a festive flair to your gathering.
- Holiday Cookies: If you have the time, bake or buy a few extra holiday cookies to complement your board. Classic gingerbread or peppermint-flavored treats will bring even more festive cheer!
- Festive Plates and Napkins: Don’t forget to set the mood by using holiday-themed plates and napkins. It adds a cheerful touch and makes the whole setup feel more special.
These serving suggestions not only round out your festive spread but also create a warm and inviting atmosphere that your guests will love. So, prepare to enjoy a delightful evening filled with laughter, sweet treats, and cherished memories!
Print
Christmas Dessert Charcuterie Board Ideas for Festive Fun
- Total Time: 20 minutes
- Yield: Serves 8-10
- Diet: Vegetarian
Description
A festive dessert charcuterie board filled with a variety of sweet treats for Christmas celebrations.
Ingredients
- Chocolate truffles – 12 pieces
- Assorted cookies – 24 pieces
- Mini cupcakes – 12 pieces
- Dried fruits – 1 cup
- Nuts – 1 cup
- Marshmallows – 1 cup
- Chocolate-covered pretzels – 1 cup
- Fresh berries – 1 cup
- Whipped cream – 1 cup
Instructions
- Gather all ingredients.
- Choose a large board or platter for presentation.
- Arrange the cookies and cupcakes in one section of the board.
- Place chocolate truffles and chocolate-covered pretzels nearby.
- Create sections for dried fruits and nuts.
- Add marshmallows and fresh berries in separate areas.
- Include a small bowl of whipped cream for dipping.
- Garnish with festive decorations if desired.
Notes
- Feel free to customize with your favorite sweets.
- Use seasonal colors for decoration.
- Consider dietary restrictions when selecting ingredients.
- Prep Time: 20 minutes
- Cook Time: 0 minutes
- Category: Dessert
- Method: Assembly
- Cuisine: American
Nutrition
- Serving Size: 1 serving
- Calories: 250
- Sugar: 20g
- Sodium: 50mg
- Fat: 12g
- Saturated Fat: 6g
- Unsaturated Fat: 4g
- Trans Fat: 0g
- Carbohydrates: 32g
- Fiber: 2g
- Protein: 3g
- Cholesterol: 30mg
Keywords: christmas dessert charcuterie board ideas