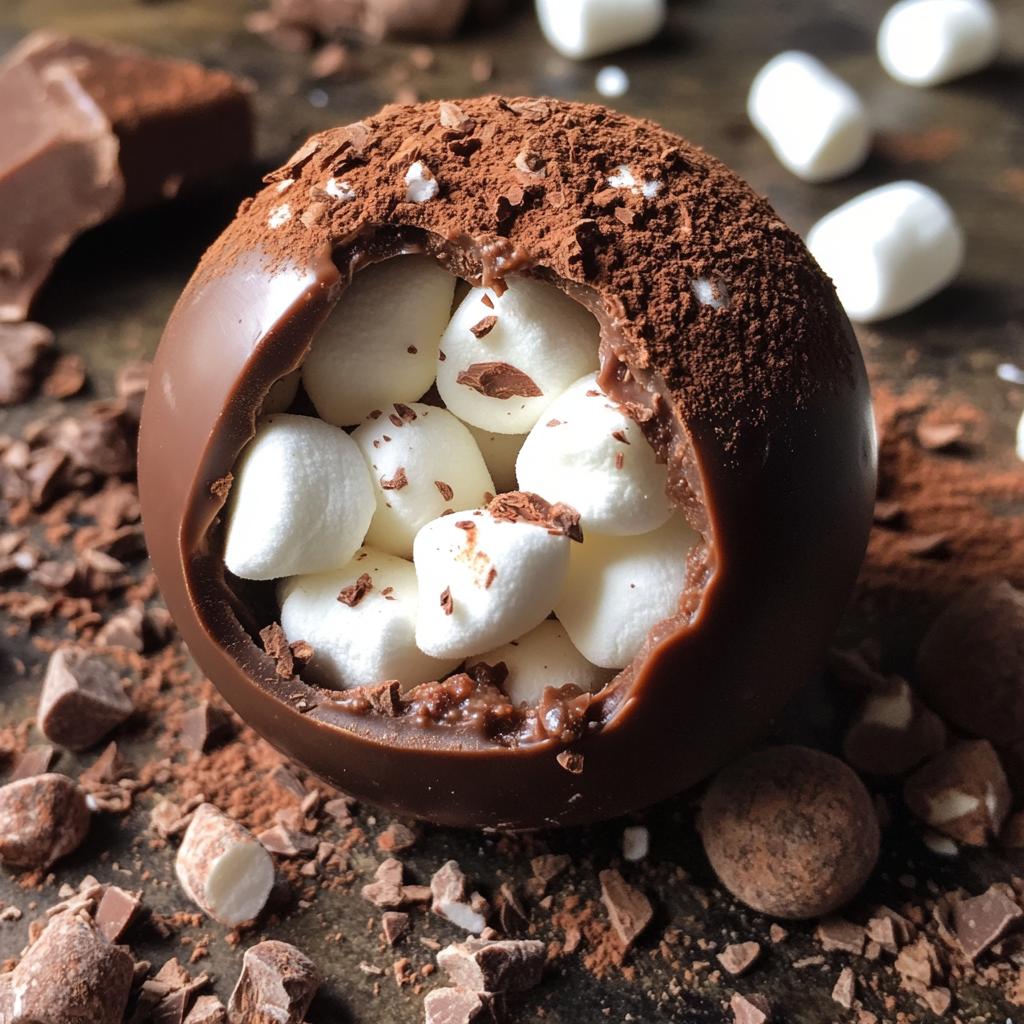
Ah, Hot Chocolate Bombs! Just saying the name makes me smile. There’s something so magical about these little chocolate orbs filled with cocoa and marshmallows. I remember the first time I made them on a chilly afternoon; the wind howled outside, and I was all cozied up in my kitchen. As I poured hot milk over one of those bombs, I could hardly contain my excitement as it melted away, revealing a swirl of chocolate and fluffy marshmallows. It was like a warm hug in a mug! Not only are they incredibly delicious, but they’re also so much fun to make, especially with kids or friends. You get to watch their faces light up as they crack open the chocolate sphere, and trust me, the aroma that fills your kitchen is just heavenly. So grab your ingredients, and let’s dive into this delightful treat that’ll warm you right up!

Ingredients List
- 1 cup chocolate chips (melted)
- 1/2 cup cocoa powder (powdered)
- 1/2 cup mini marshmallows
- 1/4 cup powdered sugar
- Silicone mold
How to Prepare Hot Chocolate Bombs
Now that you’ve got your ingredients ready, let’s dive into the fun part! Making Hot Chocolate Bombs is a step-by-step adventure, and I promise it’ll be worth every moment. Just follow these simple instructions, and you’ll have a delightful batch in no time!
Step 1: Melt the Chocolate
First things first! Grab your chocolate chips and put them in a microwave-safe bowl. Now, pop them in the microwave for about 30 seconds. After that, take them out and give them a good stir. You might need to return them to the microwave for another 15-20 seconds, but keep a close eye on it! You want that chocolate to be smooth and completely melted, not burnt. Stirring is key here, as it helps distribute the heat evenly. Wow, the smell of melted chocolate is just heavenly!
Step 2: Coat the Molds
Once your chocolate is all melty and glossy, it’s time to coat the molds! Using a spoon or a pastry brush, carefully coat the inside of each cavity of your silicone mold with a generous layer of melted chocolate. You want an even coating here to ensure your bombs hold together nicely. Don’t be shy—get in there and make sure it’s well-covered. This is where your bombs will get their structure, so take your time!
Step 3: Set the Chocolate
After you’ve coated the molds, it’s time for a little patience. Let the chocolate set for about 10 minutes at room temperature. If you’re in a hurry, you can pop them in the fridge to speed things up. You’ll know it’s ready when the chocolate is firm to the touch. This process is crucial, so don’t skip it, or you might end up with a messy situation later!
Step 4: Fill the Molds
Now comes the fun part—filling those chocolate shells! Take half of the molds and add about a tablespoon of cocoa powder, followed by a small handful of mini marshmallows. You want to leave some space at the top because we’ll cover it up soon! The cocoa powder and marshmallows are what make this treat so special, so don’t skimp on the goodies!
Step 5: Seal the Bombs
Once you’ve filled the molds, it’s time to seal them up tight! Grab more of that melted chocolate and cover the filling in each half. Make sure to spread it evenly to create a nice seal. Any gaps could lead to chocolate explosions later on! You want to ensure everything is snug and secure, so your bombs stay intact when you pop them out of the molds.
Step 6: Final Set and Release
Now, let’s finish this up! Allow the filled molds to set completely at room temperature, which might take another 15-20 minutes. Once they’re firm, it’s time to remove them from the silicone molds. Gently push from the bottom of the mold, and they should pop out easily. If they’re a bit stubborn, don’t force them—just give them a little twist. And voilà! You’ve got beautifully crafted Hot Chocolate Bombs ready to enjoy!
Tips for Success
Alright, let’s make sure your Hot Chocolate Bombs are nothing short of perfection! Here are some tried-and-true tips I’ve gathered from my own kitchen adventures that’ll help you create those dreamy chocolate treats.
Choose Quality Chocolate
Trust me, the quality of chocolate makes a massive difference! Go for good-quality chocolate chips or bars that contain at least 60% cocoa for that rich, deep flavor. You’ll taste the difference, and your Hot Chocolate Bombs will be all the more indulgent! Learn more about choosing chocolate.
Use a Silicone Mold
Silicone molds are your best friend when it comes to making these bombs. They’re flexible, which makes it super easy to pop the bombs out once they’re set. If you’re using a hard plastic mold, be extra careful when removing them, as they can be trickier and might crack your creations. A good silicone mold will give you smooth, beautiful shapes every time!
Store Properly
Once your Hot Chocolate Bombs are ready, you’ll want to store them in a cool, dry place. A sealed container works wonders to keep them fresh and prevent any moisture from ruining that delightful chocolate shell. If you’re making a big batch, consider layering them between parchment paper to avoid sticking.
Experiment with Fillings
Don’t be afraid to get creative with the fillings! Besides cocoa powder and marshmallows, you can add crushed peppermint, caramel bits, or even flavored extracts like vanilla or almond. This is where you can let your imagination run wild, and each batch can have its own unique twist!
Be Patient
Finally, don’t rush the process! Let your chocolate set completely before attempting to remove the bombs. It’s tempting to dig in right away, but patience is key to ensure you end up with perfectly formed treats. Trust me, it’s worth the wait!
Variations on Hot Chocolate Bombs
Now that you’ve mastered the classic Hot Chocolate Bombs, why not get a little adventurous? There are so many fun variations you can try that’ll make these treats even more exciting. Trust me, the possibilities are endless, and each twist brings a new layer of joy to your cozy drink experience!
Minty Delight
If you love a refreshing kick, consider adding crushed peppermint candies or peppermint extract to your cocoa filling. The mint pairs beautifully with chocolate, creating a delightful flavor explosion that’s perfect for the holidays or any chilly day! Just imagine sipping on a warm mug of minty hot chocolate—ah, bliss!
Caramel Surprise
For those with a sweet tooth, adding caramel bits or a drizzle of caramel sauce inside your bombs can take things to a whole new level. The gooey sweetness complements the chocolate and marshmallows so well. Plus, when the bomb melts, you’ll get a lovely surprise as the caramel oozes out. Yum!
Nutty Goodness
Want to add a bit of crunch? Toss in some chopped nuts, like hazelnuts or almonds, along with the cocoa and marshmallows. They’ll give your Hot Chocolate Bombs a lovely texture and a nutty flavor that pairs wonderfully with the rich chocolate. You can even toast the nuts lightly beforehand for an extra depth of flavor.
Flavored Hot Chocolate
Switch up the cocoa powder with flavored mixes! You can use white chocolate, dark chocolate, or even flavored hot chocolate mixes like mocha or salted caramel. These variations will give each bomb a unique taste, making them a fun surprise for your family and friends.
Spicy Kick
If you’re feeling bold, try adding a pinch of cayenne pepper or chili powder to your cocoa filling! This unexpected spice adds warmth and an exciting kick that contrasts beautifully with the sweetness of the marshmallows. It’s a fun twist that’ll leave your taste buds dancing!
So, get creative! Mix and match these ideas, and let your imagination run wild. You’ll be amazed at how a simple Hot Chocolate Bomb can transform into a gourmet treat that dazzles both the eyes and the taste buds. Happy experimenting!
Storage & Reheating Instructions
Now that you’ve created these delightful Hot Chocolate Bombs, let’s talk about how to keep them fresh and ready for those cozy moments! Proper storage is key to ensuring they maintain their deliciousness and don’t lose that lovely chocolate shell.
First off, once your bombs are fully set and cool, store them in a cool, dry place. A sealed container is your best friend here. I love using a cute little tin or a glass jar with a tight lid to keep them safe from moisture. Be sure to layer them gently with parchment paper if you’re stacking them. This prevents them from sticking together and keeps that gorgeous shape intact!
If you’ve made a big batch (which I highly encourage), they’ll last for about 2 weeks if stored properly. Just make sure to keep them away from direct sunlight or heat sources, as that can cause the chocolate to melt or lose its shine. Trust me, you’ll want them looking as lovely as they taste!
Now, when it comes to enjoying them, reheating is super easy! Simply place one hot chocolate bomb in your favorite mug and pour hot milk over it. You can heat the milk on the stove or in the microwave until it’s steaming but not boiling—about 1-2 minutes in the microwave should do the trick. As you pour, watch the magic happen as the chocolate melts and the marshmallows float to the top! Stir it all together, and you’ve got yourself a rich, creamy cup of joy ready to warm you from the inside out.
So, whether you’re enjoying them right away or saving a few for later, these storage and reheating tips will ensure every sip is as delightful as the first. Happy sipping!
Nutritional Information
Now, I know you’re probably curious about what’s in these delightful Hot Chocolate Bombs! While the joy of making and eating them is the main focus, it’s always good to have an idea of the nutritional breakdown. Here’s the estimated nutritional information per Hot Chocolate Bomb, which is based on typical values:
- Calories: 150
- Fat: 8g
- Saturated Fat: 5g
- Unsaturated Fat: 3g
- Trans Fat: 0g
- Cholesterol: 5mg
- Sodium: 5mg
- Carbohydrates: 20g
- Fiber: 1g
- Sugar: 10g
- Protein: 2g
Keep in mind, these values are estimates and can vary based on the specific ingredients you use. So, while you indulge in these chocolatey treats, you can enjoy them without too much worry. Just remember, moderation is key! Happy indulging!
FAQ Section
Got questions about making those delightful Hot Chocolate Bombs? Don’t worry, I’ve got you covered! Here are some of the most common questions I get, along with my trusty answers to help you master this fun treat.
How do I store Hot Chocolate Bombs?
Once your Hot Chocolate Bombs are set and cool, store them in a sealed container in a cool, dry place. A cute jar or tin works perfectly! If you’re stacking them, be sure to layer them with parchment paper to prevent sticking. They’ll stay fresh for about 2 weeks if stored properly. Just keep them away from any heat sources!
Can I use different types of chocolate?
Absolutely! You can experiment with different types of chocolate to suit your taste. Dark, milk, or even white chocolate can make fantastic Hot Chocolate Bombs. Each type will give you a unique flavor, so feel free to mix things up! Just remember, the better the quality of chocolate, the tastier your bombs will be.
What if I don’t have a silicone mold?
If you don’t have a silicone mold, no worries! You can use a muffin tin or even a regular hard plastic mold, but be extra gentle when removing the bombs. The flexibility of silicone makes it so much easier to pop them out, but with some care, you can still achieve great results with other molds!
Can I make these ahead of time?
Definitely! Hot Chocolate Bombs are perfect for making ahead of time. They actually store quite well, so you can whip up a batch and have them ready for cozy nights in or as gifts. Just keep them sealed and stored properly, and they’ll be waiting for you when the craving hits!
How do I serve Hot Chocolate Bombs?
Serving Hot Chocolate Bombs is half the fun! Simply place one bomb in your favorite mug and pour hot milk over it. You can heat the milk on the stove or in the microwave until it’s steaming hot—just don’t let it boil! Watch the magic happen as the chocolate melts and the marshmallows float to the top. Give it a good stir, and enjoy your delicious drink!
Got more questions? Feel free to ask! Making Hot Chocolate Bombs is all about having fun, so don’t hesitate to get creative and enjoy the process!
Print
Hot Chocolate Bombs: 5 Magical Recipes for Cozy Moments
- Total Time: 30 minutes
- Yield: 12 hot chocolate bombs 1x
- Diet: Vegetarian
Description
Delicious chocolate treats filled with cocoa and marshmallows.
Ingredients
- 1 cup chocolate chips
- 1/2 cup cocoa powder
- 1/2 cup mini marshmallows
- 1/4 cup powdered sugar
- Silicone mold
Instructions
- Melt chocolate chips in a microwave-safe bowl.
- Stir until smooth.
- Coat the inside of the silicone mold with melted chocolate.
- Let it set for 10 minutes.
- Add cocoa powder and mini marshmallows to half of the molds.
- Cover with more melted chocolate.
- Let the bombs set completely.
- Remove from molds and package.
Notes
- Store in a cool, dry place.
- Use different toppings for variety.
- Prep Time: 20 minutes
- Cook Time: 10 minutes
- Category: Dessert
- Method: Baking
- Cuisine: American
Nutrition
- Serving Size: 1 bomb
- Calories: 150
- Sugar: 10g
- Sodium: 5mg
- Fat: 8g
- Saturated Fat: 5g
- Unsaturated Fat: 3g
- Trans Fat: 0g
- Carbohydrates: 20g
- Fiber: 1g
- Protein: 2g
- Cholesterol: 5mg
Keywords: Hot Chocolate Bombs