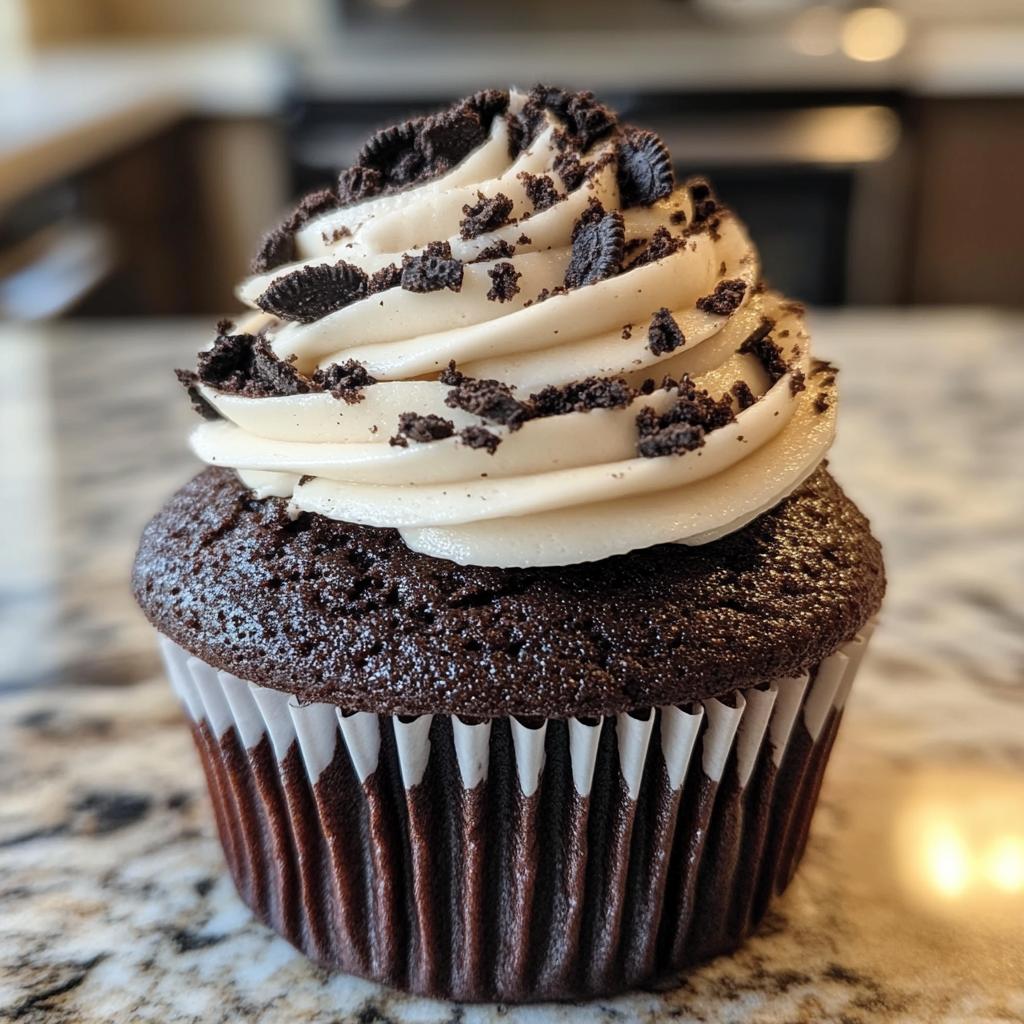
Oh my goodness, let me tell you about the absolute joy of baking with Oreos! There’s something magical about those little black-and-white cookies. The way they crumble, the rich chocolate flavor, and that creamy filling just makes my heart sing! When I decided to create these Oreo cupcakes, I knew I had to infuse that fantastic Oreo essence into my favorite chocolate cupcake recipe. The combination of soft, moist cupcakes filled with crushed Oreos and topped with a dreamy Oreo cream frosting? It’s pure bliss!
Every time I whip up a batch of these cupcakes, I’m transported back to my childhood, where my siblings and I would devour family-sized packs of Oreos while watching movies on the couch. I remember the delight on their faces when I surprised them with these cupcakes for a special treat. Trust me, the smiles and giggles that followed were priceless! These cupcakes are so easy to whip up, and they always impress friends and family alike.
So, if you’re ready to dive into a world of chocolatey goodness with a delightful Oreo twist, let’s get started on this scrumptious adventure together! You won’t regret it!
Ingredients for Oreo Cupcakes
Gathering the right ingredients is key to making these Oreo cupcakes a delicious success. Here’s what you’ll need, along with some helpful tips on each one:
- 1 1/2 cups all-purpose flour: This will be the base of your cupcakes, providing structure and texture. Make sure to spoon and level the flour for accurate measurement!
- 1 cup granulated sugar: This sweetener gives the cupcakes that delightful sweetness we all crave. Feel free to adjust slightly if you prefer a less sweet treat.
- 1/2 cup unsweetened cocoa powder: This is where the rich chocolate flavor comes from! Use high-quality cocoa for the best taste.
- 1 teaspoon baking powder: This helps the cupcakes rise beautifully, giving them that light and airy texture.
- 1/2 teaspoon baking soda: Another leavening agent that works in tandem with the baking powder for that perfect fluffiness.
- 1/4 teaspoon salt: Just a pinch enhances all the flavors and balances the sweetness.
- 1/2 cup unsalted butter, softened: This adds richness and moisture to the cupcakes. Let it sit out for at least 30 minutes before using to make mixing a breeze!
- 2 large eggs: These act as binders and contribute to the cupcakes’ structure. Make sure they’re at room temperature for even mixing.
- 1 teaspoon vanilla extract: A splash of vanilla brings out the chocolate flavor beautifully—don’t skip this step!
- 1 cup milk: This keeps the batter smooth and adds moisture. Whole milk is best, but you can use whatever you have on hand.
- 1 cup crushed Oreo cookies: This is the star of the show! Fold these into the batter for those delightful cookie bites throughout the cupcakes.
- 1 cup heavy cream: For the frosting, this will create a luscious and creamy texture. Whipping it well is key!
- 2 cups powdered sugar: This sweetens the frosting to perfection. You can adjust the amount to your liking.
- 1 teaspoon vanilla extract: Adding this to the frosting gives it that extra layer of flavor.
- 10 Oreo cookies, crushed (for topping): These will be the finishing touch, adding crunch and more Oreo goodness on top of your frosted cupcakes!
With these ingredients at the ready, you’re all set to start baking! Trust me, the smell of these cupcakes in the oven will make your mouth water!
How to Prepare Oreo Cupcakes
Now that you’ve got your ingredients ready, let’s dive into the fun part – making these Oreo cupcakes! I promise, once you get the hang of it, you’ll be whipping these up in no time. Just follow these steps, and you’ll be on your way to chocolate heaven!
Prepping the Oven and Muffin Tin
First things first, preheat your oven to 350°F (175°C). This is crucial because a properly heated oven helps your cupcakes rise beautifully. While that’s heating up, grab your muffin tin and line it with cupcake liners. I love using fun designs to give my cupcakes a pop of color, but classic white works just as well. Make sure to press them down firmly into the tin so they hold their shape when you pour in the batter!
Mixing the Batter
Alright, let’s mix things up! In a large mixing bowl, combine your all-purpose flour, granulated sugar, cocoa powder, baking powder, baking soda, and salt. Just a little tip: whisk them together thoroughly to ensure there are no lumps – this mix is the base of your cupcake magic!
Next, add in your softened butter, eggs, and vanilla extract. I usually start mixing with a hand mixer on low speed until everything is combined, then I crank it up to medium. You want it to be smooth and creamy, so don’t rush this part! Once it’s looking good, slowly pour in the milk, mixing well until you have a lovely, velvety batter. Finally, gently fold in those crushed Oreo cookies. I like to use a spatula for this – it’s a gentle touch that helps the cookies stay intact!
Baking the Cupcakes
Now, it’s time to pour that luscious batter into your prepared liners! Fill each one about two-thirds full; this allows room for the cupcakes to rise without overflowing. Pop the muffin tin into your preheated oven and let them bake for 18-20 minutes. Oh, the smell of chocolate baking is just divine!
To check for doneness, stick a toothpick into the center of a cupcake; if it comes out clean or with a few moist crumbs, you’re all set! If it’s still wet with batter, give them a couple more minutes and check again. Once they’re done, remove the tin from the oven and let the cupcakes cool in the tin for about 5 minutes before transferring them to a wire rack to cool completely. This step is super important; we want them cool before frosting!
Making the Oreo Cream Frosting
While those cupcakes are cooling, let’s whip up the frosting! In a chilled mixing bowl, pour in your heavy cream and start whipping it on medium speed. You’re looking for soft peaks to form – this should take about 2-3 minutes. Once you see those lovely peaks, gradually add in the powdered sugar and vanilla extract. Keep mixing until it’s thick and creamy. Trust me, the texture is everything – you want it to be smooth but thick enough to hold its shape when you frost!
Frosting and Topping the Cupcakes
Now comes the best part – frosting those cupcakes! I use a piping bag fitted with a star tip for a fancy look, but a simple spatula works just as well if you prefer a more rustic style. Just swirl that frosting on top, letting it be as generous as you want!
Finally, sprinkle those crushed Oreo cookies on top for that delightful crunch and extra Oreo flair. You can even get creative and add a whole Oreo cookie on top for a dramatic effect! And voilà, your Oreo cupcakes are ready to shine! Just try to resist eating them all at once – though I can’t blame you if you do!
Why You’ll Love This Recipe
- Quick and Easy: These Oreo cupcakes come together in just about 40 minutes, making them a perfect last-minute treat for any occasion!
- Decadent Flavor: With rich chocolate cupcakes packed with Oreo crumbs and topped with creamy Oreo frosting, each bite is a delightful explosion of flavor!
- Perfect for Any Occasion: Whether it’s a birthday party, family gathering, or just a cozy night in, these cupcakes are guaranteed to impress and satisfy everyone!
- Fun to Make: Baking these cupcakes is a joy! From mixing the batter to frosting them, it’s a fun activity that anyone can enjoy, especially with kids.
- Customizable: Feel free to get creative! You can mix in different candies, use various frostings, or even play with toppings to make them your own.
- Always a Crowd-Pleaser: Seriously, who can resist Oreos? These cupcakes have become a favorite among friends and family, and they’ll surely be a hit wherever you serve them!
Tips for Success
Alright, let’s make sure your Oreo cupcakes turn out absolutely perfect! Here are some of my top tips and tricks that I’ve learned from my own baking adventures:
- Room Temperature Ingredients: Make sure your eggs and butter are at room temperature before you start mixing. This helps create a smoother batter and ensures everything blends nicely!
- Don’t Overmix: When you add the flour mixture to the wet ingredients, mix just until combined. Overmixing can lead to tough cupcakes, and we definitely want them light and fluffy.
- Use Quality Cocoa Powder: The flavor of your cupcakes hinges on the cocoa powder. Opt for a high-quality unsweetened cocoa – it really makes a difference in taste!
- Check Your Oven Temperature: Ovens can vary in temperature, so it’s a good idea to have an oven thermometer handy. This ensures your cupcakes bake evenly and don’t end up overcooked or undercooked.
- Cool Completely Before Frosting: It might be tempting to frost warm cupcakes, but trust me, waiting is worth it! Frosting warm cupcakes can lead to a melty mess, and nobody wants that!
- Adjust Frosting Sweetness: If you find the frosting too sweet for your taste, you can reduce the powdered sugar slightly. A bit of cream cheese mixed in can also add a nice tang if you want to switch things up!
- Experiment with Mix-ins: Feel free to add chocolate chips or other goodies into the batter along with the Oreo crumbs for an extra treat. Just be cautious not to overload it – you want to maintain that perfect cupcake texture!
- Storing Leftovers: If you have any cupcakes left (which is rare!), store them in an airtight container at room temperature for up to three days. If you want to keep them longer, you can refrigerate them, but let them come to room temperature before serving for the best flavor!
By keeping these tips in mind, you’ll be well on your way to baking Oreo cupcakes that will wow everyone around you! Happy baking!
Variations on Oreo Cupcakes
Now that you’ve mastered the classic Oreo cupcakes, let’s explore some fun variations to switch things up! I love experimenting with flavors and textures, and these ideas will definitely add a delightful twist to your baked treats:
Different Frosting Options
While the Oreo cream frosting is heavenly, feel free to get creative with your frosting choices:
- Chocolate Ganache: For a richer experience, try topping your cupcakes with a silky chocolate ganache. Just melt some chocolate with heavy cream, let it cool slightly, and pour it over your frosted cupcakes for a decadent finish!
- Peanut Butter Frosting: If you’re a peanut butter lover like me, whip up a creamy peanut butter frosting! Just mix equal parts peanut butter and butter, add powdered sugar, and a splash of milk until you reach the desired consistency.
- Mint Chocolate Frosting: Give your cupcakes a refreshing twist by adding a few drops of peppermint extract to your frosting. It’s like a thin mint cookie in cupcake form!
Fun Mix-ins
Mix-ins can completely transform your Oreo cupcakes! Consider these delicious additions:
- Chocolate Chips: Fold in a cup of semi-sweet or white chocolate chips into the batter for an extra chocolatey punch. They melt beautifully and add a nice texture!
- Other Cookie Crumbles: Experiment with different cookie crumbles, like Nutter Butter or even Chips Ahoy! This adds unique flavors and surprises in each bite.
- Fruit Additions: For a fruity twist, try folding in some mini marshmallows or even small pieces of strawberries or raspberries. Just be sure to adjust the batter slightly to maintain that perfect texture!
Theme Ideas
Why not have fun with themes? Here are a few ideas to spark your creativity:
- Birthday Bash: Decorate your cupcakes with colorful sprinkles, edible glitter, and themed toppers for a festive celebration!
- Halloween Treats: Add orange and black sprinkles, or top with spooky cookie decorations. You could even use candy corn for a fun touch!
- Seasonal Flavors: Incorporate seasonal flavors like pumpkin spice or cinnamon during fall, or peppermint bark for a wintery treat!
With these variations in mind, your Oreo cupcakes will never be boring! Feel free to experiment and make them your own. The joy of baking is in the creativity, so have fun with it!
Storage & Reheating Instructions
Now that you’ve made these scrumptious Oreo cupcakes, let’s talk about how to store any leftovers (if there are any!). Trust me, these treats are so delicious, they might disappear quickly, but just in case, here’s how to keep them fresh:
- Storing Leftovers: Once your cupcakes are completely cooled, place them in an airtight container. This helps keep them moist and prevents them from drying out. If you’re stacking them, just make sure to place a piece of parchment paper between each layer to avoid crushing that gorgeous frosting!
- Room Temperature or Refrigeration: You can store your Oreo cupcakes at room temperature for up to three days. If you want to keep them longer, pop them in the fridge where they’ll last about a week. Just remember, refrigerating them can change the texture slightly, so let them sit out for a bit to come back to room temperature before enjoying!
- Freezing for Later: Want to save some for a rainy day? You can freeze your cupcakes! Just wrap them individually in plastic wrap and then place them in a freezer-safe bag. They can last up to three months this way. When you’re ready to indulge, let them thaw in the fridge overnight, then bring them to room temperature before frosting if you didn’t frost them before freezing.
As for reheating, if you find yourself with a cupcake that’s lost its warmth, you can pop it in the microwave for just 10-15 seconds. This will bring back that delightful soft texture! Just be careful not to overdo it, or you’ll end up with a cupcake that’s more like a little volcano!
With these storage and reheating tips, you can enjoy your Oreo cupcakes any time you crave a sweet treat! Happy snacking!
Nutritional Information
When it comes to delicious Oreo cupcakes, it’s always good to know what you’re indulging in! Here’s a general breakdown of the nutritional values per cupcake:
- Calories: 250
- Sugar: 20g
- Sodium: 150mg
- Fat: 12g
- Saturated Fat: 7g
- Unsaturated Fat: 4g
- Trans Fat: 0g
- Carbohydrates: 32g
- Fiber: 1g
- Protein: 3g
- Cholesterol: 40mg
Keep in mind that these values can vary based on the specific ingredients and brands you use, so consider this information as a helpful guideline rather than precise measurements. Enjoy your baking and those delightful cupcakes without worry!
FAQ Section
Got questions about making these scrumptious Oreo cupcakes? Don’t worry, I’ve got you covered! Here are some frequently asked questions that might help you out:
Q1: Can I use gluten-free flour for these cupcakes?
Absolutely! You can substitute the all-purpose flour with a gluten-free blend. Just make sure it’s a 1:1 ratio blend that’s designed for baking to get the best results!
Q2: How can I make these cupcakes less sweet?
If you find the frosting too sweet, you can reduce the amount of powdered sugar. You could also add a little cream cheese to the frosting for a tangy balance that cuts through the sweetness!
Q3: Can I make these cupcakes ahead of time?
Definitely! You can prepare the cupcakes a day in advance. Just store them in an airtight container at room temperature. Frost them the day you plan to serve them for the freshest taste!
Q4: What’s the best way to crush the Oreo cookies?
I find that placing them in a zip-top bag and using a rolling pin to crush them works wonders! You can also pulse them in a food processor if you want a finer crumb. Just be careful not to turn them into powder!
Q5: How do I store leftover cupcakes?
Store your Oreo cupcakes in an airtight container at room temperature for up to three days. If you want to keep them longer, you can refrigerate them for about a week, but let them come to room temperature before enjoying!
Q6: Can I freeze these cupcakes?
Yes! You can freeze the cupcakes without frosting for up to three months. Just wrap them in plastic wrap and place them in a freezer-safe bag. Thaw them in the fridge overnight when you’re ready to enjoy!
Q7: How do I know when my cupcakes are done baking?
Great question! Use the toothpick test: insert a toothpick into the center of a cupcake. If it comes out clean or with a few moist crumbs, they’re done. If it’s wet, give them a couple more minutes!
If you have any other questions or need further assistance, feel free to reach out! Happy baking, and enjoy those delicious Oreo cupcakes!
Print
Oreo Cupcakes: 7 Delightful Steps to Pure Bliss
- Total Time: 40 minutes
- Yield: 12 cupcakes 1x
- Diet: Vegetarian
Description
Delicious chocolate cupcakes filled with Oreo crumbs and topped with Oreo cream frosting.
Ingredients
- 1 1/2 cups all-purpose flour
- 1 cup granulated sugar
- 1/2 cup unsweetened cocoa powder
- 1 teaspoon baking powder
- 1/2 teaspoon baking soda
- 1/4 teaspoon salt
- 1/2 cup unsalted butter, softened
- 2 large eggs
- 1 teaspoon vanilla extract
- 1 cup milk
- 1 cup crushed Oreo cookies
- 1 cup heavy cream
- 2 cups powdered sugar
- 1 teaspoon vanilla extract
- 10 Oreo cookies, crushed (for topping)
Instructions
- Preheat oven to 350°F (175°C). Line a muffin tin with cupcake liners.
- In a bowl, mix flour, sugar, cocoa powder, baking powder, baking soda, and salt.
- Add softened butter, eggs, and vanilla extract. Mix until smooth.
- Gradually add milk and mix well.
- Fold in crushed Oreo cookies.
- Pour batter into prepared liners, filling each about two-thirds full.
- Bake for 18-20 minutes or until a toothpick comes out clean.
- Let cupcakes cool completely.
- For frosting, whip heavy cream until soft peaks form. Gradually add powdered sugar and vanilla extract.
- Frost cooled cupcakes and sprinkle with crushed Oreo cookies on top.
Notes
- Store cupcakes in an airtight container.
- These can be made a day in advance.
- Adjust sweetness of frosting to your preference.
- Prep Time: 20 minutes
- Cook Time: 20 minutes
- Category: Dessert
- Method: Baking
- Cuisine: American
Nutrition
- Serving Size: 1 cupcake
- Calories: 250
- Sugar: 20g
- Sodium: 150mg
- Fat: 12g
- Saturated Fat: 7g
- Unsaturated Fat: 4g
- Trans Fat: 0g
- Carbohydrates: 32g
- Fiber: 1g
- Protein: 3g
- Cholesterol: 40mg
Keywords: oreo cupcakes, chocolate cupcakes, dessert recipes