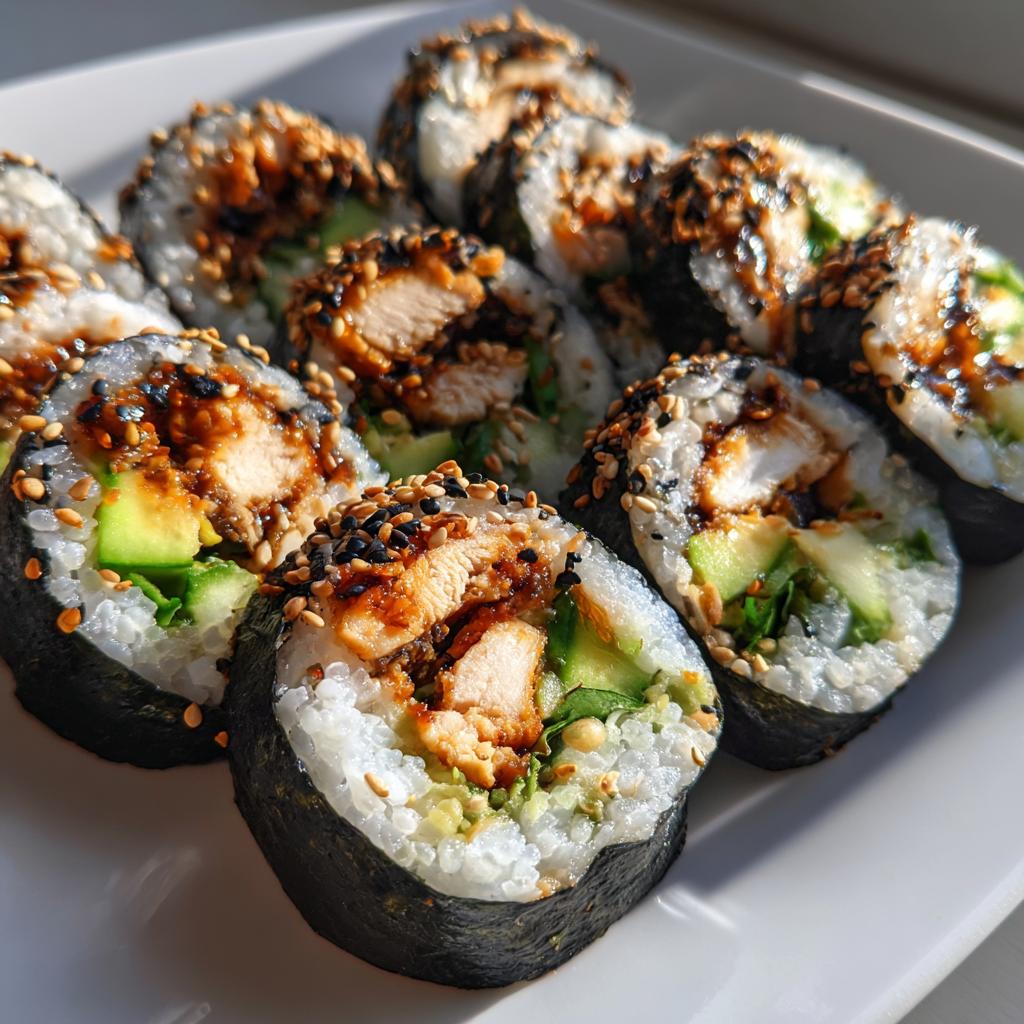
Oh my goodness, let me tell you about teriyaki chicken sushi rolls! These delightful bites are like a little hug for your taste buds. Picture this: tender pieces of teriyaki chicken, all sweet and savory, wrapped up with fresh veggies and perfectly seasoned sushi rice. It’s a fusion of flavors and textures that just works, you know? The chewy nori gives a lovely contrast to the soft chicken and crunchy cucumber, while the avocado adds that creamy touch that makes each bite feel like a celebration.
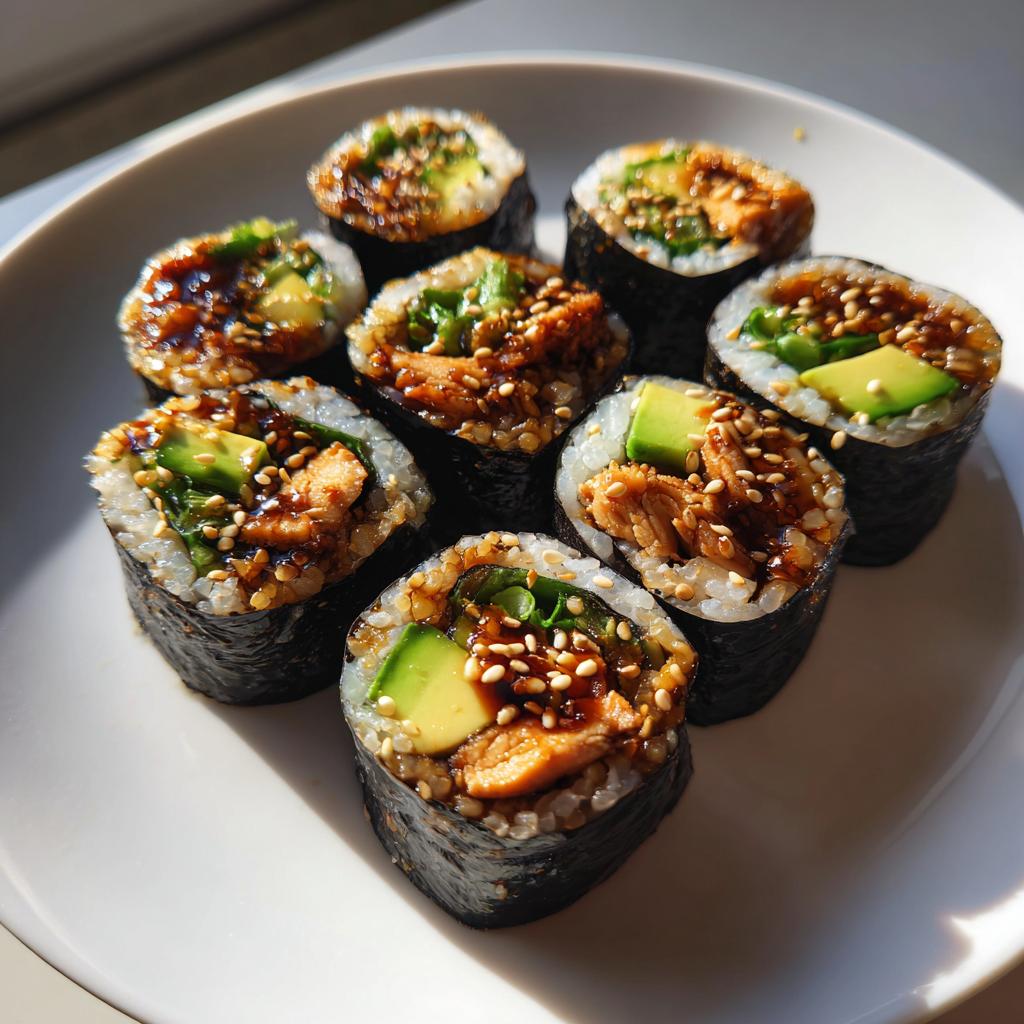
What I love most is how easy they are to whip up at home! You don’t need to be a sushi master; just a little bit of practice, and you’ll be rolling like a pro. Plus, these rolls are a fantastic way to impress friends at a dinner party or enjoy a cozy night in. Trust me, once you take that first bite, you’ll understand why I can’t get enough of these teriyaki chicken sushi rolls. They’re a perfect blend of comfort food and a fun culinary adventure!
Ingredients for Teriyaki Chicken Sushi Rolls
- 2 cups sushi rice, rinsed and drained
- 1 lb cooked chicken breast, sliced into thin strips
- 1/4 cup teriyaki sauce, for flavoring the chicken
- 4 sheets nori, for wrapping
- 1 cucumber, julienned for crunch
- 1 avocado, sliced for creaminess
- 1/4 cup sesame seeds, for garnish
- Wasabi, for serving (optional but oh-so-good!)
- Soy sauce, for dipping and enhancing flavor
How to Prepare Teriyaki Chicken Sushi Rolls
Alright, let’s get into the fun part – making those delicious teriyaki chicken sushi rolls! It’s all about following a few simple steps, and trust me, once you get the hang of it, you’ll be rolling like a sushi pro in no time. Let’s dive in!
Cooking the Sushi Rice
First things first, we need to cook that sushi rice perfectly. Rinse 2 cups of sushi rice under cold water until the water runs clear; this helps remove excess starch and keeps it from getting too sticky. Now, follow the package instructions, but here’s my little tip: for the best texture, use a 1:1 water-to-rice ratio. So, after rinsing, add the rice and 2 cups of water to a rice cooker or pot. If you’re using a pot, bring it to a boil, then cover and reduce the heat to low, letting it simmer for about 15 minutes. Once done, remove it from heat and let it sit for another 10 minutes – this step is crucial! Fluff it gently with a fork and let it cool a bit before using it in your rolls.
Preparing the Chicken
Now onto the star of the show – the chicken! You’ll want to take your 1 lb of cooked chicken breast and slice it into thin strips. The thinner, the better, because they’ll fit perfectly in your rolls. In a bowl, mix the chicken with 1/4 cup of teriyaki sauce. You can let it marinate for about 10-15 minutes if you have the time, but even if you’re in a rush, just coating the chicken well will infuse enough flavor. Oh, and if you want to kick it up a notch, feel free to sprinkle in some sesame seeds or a dash of sesame oil for an extra layer of yum!
Assembling the Sushi Rolls
Time to bring everything together! Grab a bamboo sushi mat and lay a sheet of nori shiny side down on it. With wet hands (this will help prevent the rice from sticking), take a handful of your cooled sushi rice and spread it evenly over the nori, leaving about an inch at the top free of rice. It’s like a canvas – a little art project! Now, lay down your teriyaki chicken strips, followed by the julienned cucumber and slices of avocado in a line across the rice. The colors are just gorgeous, aren’t they?
Here’s the trick: when you start rolling, press firmly but gently, tucking the filling in as you go. Keep rolling until you reach that bare edge of nori. You can dab a little water on the edge to help seal it. Once it’s all rolled up, give it a gentle squeeze to make sure everything stays together. Oh, and remember: keeping your workspace clean makes a world of difference; rinse your hands between steps to avoid mess!
Cutting and Serving the Rolls
Now, let’s slice those rolls! Take a sharp knife (wetting it helps for clean cuts) and cut the roll into bite-sized pieces. I usually aim for about six to eight pieces per roll, but do what feels right for you! For serving, arrange your sushi rolls on a platter and sprinkle some sesame seeds on top for that beautiful finishing touch. Serve with wasabi and soy sauce on the side for dipping – the perfect way to enhance those rich flavors!
And there you have it! Your teriyaki chicken sushi rolls are ready to impress. Just remember, the more you practice, the more fun you’ll have with this process. Enjoy every bite of your homemade sushi adventure!
Tips for Success with Teriyaki Chicken Sushi Rolls
Alright, my friend, let’s make sure your teriyaki chicken sushi rolls turn out absolutely fabulous! Here are some tried-and-true tips that I’ve picked up along the way, which will help you nail it every time.
Keep Your Hands Wet
This is a game changer! When handling sushi rice, always keep a bowl of water nearby and wet your hands before touching the rice. This simple trick prevents the rice from sticking to your fingers and makes spreading it over the nori a breeze. Trust me, it makes all the difference!
Perfecting Your Roll
When you start rolling, don’t rush it. Take your time and use gentle pressure as you roll, tucking in the filling snugly. If you feel it’s getting too tight, ease up a bit. A well-rolled sushi should hold together but not feel like a vice grip. It’s all about finding that sweet spot!
Experiment with Fillings
While teriyaki chicken is a star in this recipe, don’t hesitate to mix it up! You can add other ingredients like cream cheese, cooked shrimp, or even spicy tuna for a twist. Feel free to throw in a handful of other veggies too, like bell peppers or sprouts, to keep things fresh and exciting.
Use a Sharp Knife
For cutting your rolls, a sharp knife is essential. Wet the blade before slicing to ensure clean edges. This helps keep the filling intact and gives you those beautiful, Instagram-worthy pieces. Who doesn’t love a good-looking sushi roll?
Practice Makes Perfect
Don’t be discouraged if your first few rolls aren’t perfect. Sushi rolling is an art that gets better with practice. Each attempt will teach you something new, and soon, you’ll be rolling like a pro! Enjoy the process, and don’t forget to have fun with it!
With these tips in your back pocket, you’ll be well on your way to making delicious teriyaki chicken sushi rolls that impress everyone around you. Happy rolling!
FAQ about Teriyaki Chicken Sushi Rolls
Got questions about making your teriyaki chicken sushi rolls? Don’t worry; I’ve got you covered! Here are some common queries I hear along with my friendly answers to help you out.
Can I use leftover chicken for this recipe?
Absolutely! Leftover rotisserie chicken or any cooked chicken works perfectly. Just slice it thin and toss it with teriyaki sauce for flavor. It’s a great way to use up leftovers and save time!
What if I can’t find sushi rice?
If sushi rice isn’t available, you can substitute it with short-grain rice. It won’t have the same sticky texture, but it’ll still hold together fairly well. Just remember to adjust the water ratio according to the rice type you’re using.
How can I make these sushi rolls vegetarian?
Going vegetarian? No problem! Swap out the teriyaki chicken for marinated tofu, tempura vegetables, or even grilled eggplant. You can also amp up the veggies like bell peppers, carrots, and spinach for a vibrant roll.
Can I make sushi rolls ahead of time?
Yes, you can! Just keep them tightly wrapped in plastic wrap in the fridge for up to 24 hours. However, I recommend waiting to cut them until just before serving to keep them looking fresh and neat.
What’s the best way to store leftover sushi rolls?
If you have leftover sushi rolls, wrap them tightly in plastic wrap or place them in an airtight container. Store them in the fridge and try to eat them within 24 hours for the best flavor and texture. Just remember, sushi is best fresh!
Can I freeze sushi rolls?
While it’s not ideal, you can freeze uncut sushi rolls for a short time. Wrap them tightly in plastic wrap and then place them in a freezer bag. Thaw them in the fridge before eating, but keep in mind that the texture might change a bit.
I hope these FAQs help you feel more confident in your sushi-making journey! If you have any other questions, don’t hesitate to ask. Happy rolling!
Nutritional Information for Teriyaki Chicken Sushi Rolls
When you’re enjoying these delightful teriyaki chicken sushi rolls, it’s good to know what you’re putting into your body! Here’s a breakdown of the typical nutritional values per serving (that’s one roll, my friend). Keep in mind that these are estimates and can vary based on specific ingredients used.
- Calories: 300
- Fat: 8g
- Saturated Fat: 1g
- Unsaturated Fat: 6g
- Trans Fat: 0g
- Cholesterol: 60mg
- Sodium: 600mg
- Carbohydrates: 45g
- Fiber: 2g
- Sugar: 2g
- Protein: 20g
With a nice balance of protein from the chicken and healthy fats from the avocado, these sushi rolls are not only delicious but also a fun way to enjoy a meal that’s relatively low in fat. Perfect for a light lunch or dinner while still feeling satisfied!
Why You’ll Love This Recipe
- Easy to Make: You don’t need to be a sushi expert! With just a few simple steps, you’ll be rolling your own teriyaki chicken sushi in no time.
- Delicious Flavors: The combination of sweet teriyaki chicken, fresh veggies, and creamy avocado creates a flavor explosion that’s simply irresistible.
- Customizable: Feel free to mix and match ingredients! You can add your favorite veggies or swap the chicken for tofu or shrimp for a personal touch.
- Healthy Meal Option: Packed with protein and healthy fats, these sushi rolls make for a nutritious meal that won’t weigh you down.
- Perfect for Any Occasion: Whether it’s a cozy night in, a fun dinner party, or a lunch on-the-go, these sushi rolls fit right in.
- Fun to Share: Sushi rolls are great for sharing with friends and family, turning every meal into a delightful experience filled with laughter and good vibes!
Serving Suggestions
Now that you’ve mastered the art of making teriyaki chicken sushi rolls, let’s talk about what to serve alongside them to elevate your meal! These rolls are delicious on their own, but pairing them with a few complementary dishes can create a complete and satisfying dining experience. Here are some of my favorite suggestions:
- Miso Soup: A warm bowl of miso soup is the perfect start to your meal. Its savory broth and soft tofu complement the flavors of the sushi rolls beautifully.
- Edamame: Steamed edamame sprinkled with sea salt makes for a great appetizer. It’s light, healthy, and adds a fun, interactive element to your meal as you pop the pods open!
- Agedashi Tofu: This lightly fried tofu served in a savory dashi broth is a delightful side that adds a different texture and flavor profile to your sushi experience.
- Japanese Pickles (Tsukemono): A small dish of assorted pickles brings a refreshing crunch and tang that helps cleanse the palate between bites of your rich sushi rolls.
- Seaweed Salad: A light and refreshing seaweed salad with sesame dressing adds a nice contrast to the teriyaki rolls. It’s packed with flavor and nutrients, making it a wonderful complement.
- Tempura Vegetables: Crispy tempura vegetables, like sweet potato or zucchini, introduce a satisfying crunch and can be dipped in soy sauce or a tempura dipping sauce for added flavor.
And there you have it! These sides not only enhance the overall meal but also bring a delightful variety of flavors and textures to your dining table. Whether you’re hosting a dinner party or enjoying a cozy night in, these suggestions will surely impress and satisfy your guests (or yourself!). Enjoy your sushi feast!
Print
Teriyaki Chicken Sushi Rolls: 5 Perfect Steps to Delight
- Total Time: 35 minutes
- Yield: 4 servings 1x
- Diet: Low Fat
Description
Teriyaki chicken sushi rolls are a delicious twist on traditional sushi. They combine tender teriyaki chicken with fresh vegetables and sushi rice, all wrapped in nori.
Ingredients
- 2 cups sushi rice
- 1 lb chicken breast, cooked and sliced
- 1/4 cup teriyaki sauce
- 4 sheets nori
- 1 cucumber, julienned
- 1 avocado, sliced
- 1/4 cup sesame seeds
- Wasabi, for serving
- Soy sauce, for serving
Instructions
- Cook the sushi rice according to package instructions.
- Mix the cooked chicken with teriyaki sauce.
- Lay a sheet of nori on a bamboo mat.
- Spread a layer of sushi rice over the nori, leaving a small border.
- Place chicken, cucumber, and avocado in a line across the rice.
- Roll the sushi tightly using the bamboo mat.
- Slice the roll into bite-sized pieces.
- Sprinkle sesame seeds on top.
- Serve with wasabi and soy sauce.
Notes
- Use a sharp knife to cut the rolls for clean edges.
- Keep a bowl of water nearby to wet your hands when handling sushi rice.
- Feel free to add other vegetables or proteins to your rolls.
- Prep Time: 20 minutes
- Cook Time: 15 minutes
- Category: Main Course
- Method: Rolling
- Cuisine: Japanese
Nutrition
- Serving Size: 1 roll
- Calories: 300
- Sugar: 2g
- Sodium: 600mg
- Fat: 8g
- Saturated Fat: 1g
- Unsaturated Fat: 6g
- Trans Fat: 0g
- Carbohydrates: 45g
- Fiber: 2g
- Protein: 20g
- Cholesterol: 60mg
Keywords: teriyaki chicken sushi rolls, sushi, teriyaki chicken, Japanese cuisine


